Using G.V() on AWS Marketplace
G.V() is available as a web version on the AWS Marketplace at https://aws.amazon.com/marketplace/pp/prodview-lifzpx4adcwsq.
It's a graph database client, perfect for developers looking to start on a graph project or support an existing one. It is compatible with Amazon Neptune's Gremlin and Cypher API, as well as Apache TinkerPop enabled graph databases such as JanusGraph, Gremlin Server and Aerospike Graph. It is also compatible with Google Cloud Spanner Graph, Dgraph, Oracle Graph and many more graph databases.
We provide state of the art development tools with advanced autocomplete, syntax checking and graph visualization.
With G.V() you can:
- View your graph database's schema in 1 click
- Write and run Gremlin queries, and run them against your database
- Write and run Cypher queries on Amazon Neptune, Puppygraph and many more
- Visualize query results across a variety of formats such as graph visualization, JSON and tables
- Explore your data interactively with our no-code graph database browser
- Debug Gremlin queries step by step, and access profiling tools for Gremlin and Cypher
It is deployed over an EC2 instance, exposing a web service over port 443, protected via basic authentication, from which you can access our application's web interface.
Deploying a G.V() instance
To deploy G.V(), follow these steps:
- Navigate to https://aws.amazon.com/marketplace/pp/prodview-lifzpx4adcwsq.
- Click on View Purchase Options or Try for free if this is your first time deploying G.V()
- Click on Accept Terms after reviewing our terms and conditions (standard contract for AWS Marketplace). Upon accepting, AWS License Manager will issue a new license for your AWS account to use G.V(). This process may take up to a couple minutes to complete.
- Click on Continue to Configuration
- Leave the default fulfillment option
- Select the latest version of the software
- Select your region - we recommend using the same region as your database(s)
- Click Continue to Launch
- Under Choose Action, select Launch through EC2, and click Launch
- Enter a name for the EC2 instance that will be launched
- Under Instance Type, select one of our available instance types according to our sizing guide
- Under Key pair (login), select an SSH key pair to authenticate to your EC2 instance via SSH. You will occasionally need to SSH into your G.V() EC2 instance to perform operations such as password change, version updates or TLS certificate deployment.
- Under Network settings, follow these instructions:
- Leave the default VPC setting selection unless your Amazon Neptune instance (or other database) that you want to connect G.V() to is deployed to a specific VPC
- Select your subnet or leave the default selection
- Set Auto-assign public IP to Enable
- Leave the Firewall (security groups) settings as default unless to restrict access to port 22 and 443 to specific IP address(es).
- Under Configure storage, set the Root volume size to 30gb, the free tier eligible limit. It will be enough storage for any amount of user.
- Under Advanced Details, on the IAM instance field, follow the instructions at Configuring the IAM role for the instance to create the optional IAM instance profile to run G.V() on EC2
- Click Launch instance
The deployment process is fully automatic and the G.V() application should be ready within 2 minutes.
Make a note of the EC2 instance id as you will need to authenticate to G.V(). In the EC2 console, click on the newly created EC2 instance to display its public IPv4 DNS which you will need to enter in your browser to access the deployed product.
Pricing
G.V() is priced using the hourly model on the AWS marketplace. Charges only incur for instances of G.V() that are up and running. For pricing details as well as sizing advice, see the sizing guide below.
Sizing Guide
G.V() can be deployed on EC2 instance types with varying levels of performance. The sizing guide below indicates how many users can use G.V() concurrently for a given EC2 instance type.
| Instance Type | Concurrent users | Product cost per hour |
|---|---|---|
| t3.medium | Up to 3 users | $0.32 |
| t3.large | Up to 5 users | $0.64 |
| t3.xlarge | Up to 10 users | $1.28 |
| t3.2xlarge | Up to 15 users | $2.56 |
| m5.large | Up to 5 users | $0.80 |
| m5.xlarge | Up to 10 users | $1.60 |
| m5.2xlarge | Up to 15 users | $3.20 |
| m5.4xlarge | Over 20 users | $6.40 |
Regardless of the EC2 instance type you choose or the amount of concurrent users, a root volume size of 30gb for the instance will be enough to run the service smoothly.
Architecture
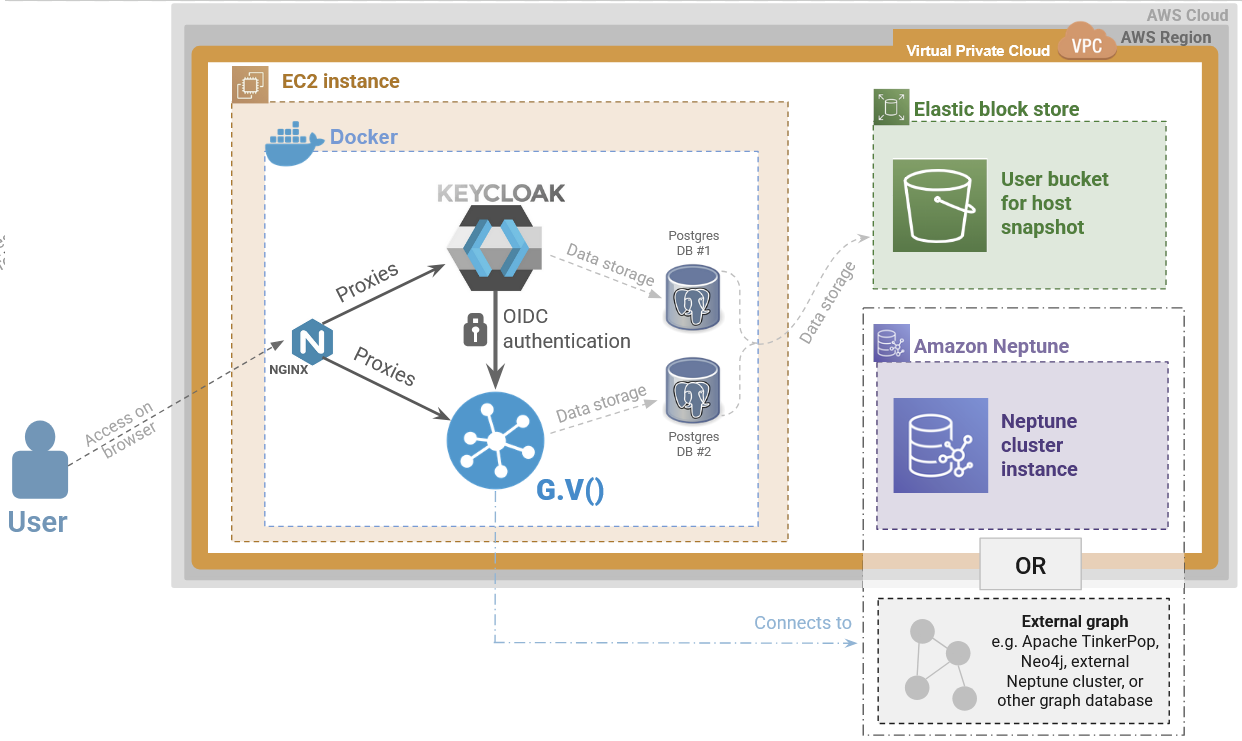
G.V() runs on an Amazon Linux 2023 EC2 instance with 3 Docker containers configured and started via docker-compose. Our AMI comes pre-bundled with all the binaries and configurations necessary to run the application via Docker.
The Docker containers are as follows:
- gdotv-developer: The G.V() web application
- gdotv-postgres: a PostgreSQL database storing configuration details for the G.V() web application
- gdotv-nginx: an NGINX reverse-proxy fronting the application over port 443 on the EC2 instance, with TLS enabled by default
- gdotv-keycloak: a Keycloak instance that provides G.V() with user authentication and federation features, which can be configured further to enable Single Sign On authentication flows, or username/password/2FA login.
- gdotv-keycloak-postgres: A PostgreSQL database storing configuration details for the Keycloak instance
The architecture of the application is as shown below:
Common deployment issues
I have deployed G.V() over a public EC2 hostname but I can't reach it on port 443 or 22 (or both)
If you cannot access your G.V() instance over its public EC2 instance hostname, you should investigate the following:
- Check your security group rules
- Check the route table for the subnet
- Check the network access control list (ACL) for the subnet
- Check the EC2 connectivity troubleshooting guide instructions at https://docs.aws.amazon.com/AWSEC2/latest/UserGuide/TroubleshootingInstancesConnecting.html#TroubleshootingInstancesConnectionTimeout
- Check with your AWS infrastructure engineering team for other potential restrictions that might impact connectivity to your EC2 instance
I have deployed G.V() but there is no public EC2 hostname assigned to the EC2 instance
Your organization may have disabled public endpoints on EC2 by default - you will need to either explicitly enable it in the deployment configuration in the EC2 console when creating a new G.V() instance, or modify your already deployed EC2 instance to enable a public endpoint.
G.V() is failing to retrieve EC2 IAM Instance Profile credentials
Failure to retrieve EC2 IAM Instance Profile Credentials is typically due to the Instance Metadata Service Version 2 (IMDSv2) API is not available on your host. IMDSv2 is required for G.V() to retrieve your instance profile credentials as it internally uses AWS SDK v2. To test that the API is available on your host, you can run the following command:
TOKEN=curl -X PUT "<http://169.254.169.254/latest/api/token>" -H "X-aws-ec2-metadata-token-ttl-seconds: 21600" \
&& curl -H "X-aws-ec2-metadata-token: $TOKEN" http://169.254.169.254/latest/meta-data/iam/security-credentials/
If the above request responds with a 404 error, this indicates the API is unavailable on the host and that IMDSv2 is therefore not enabled.
Accessing G.V() on your web browser
Upon completion, the newly created EC2 instance with G.V() running will be accessible at the instance's public IPv4 DNS over port 443. To access the application, navigate on your browser to https://{instance-public-hostname}.
By default, G.V() uses a self-signed TLS certificate to enable traffic over HTTPS. Since the certificate is self-signed, you will be notified in your web browser that the connection may be insecure.
To trust the certificate, in your browser, click on Advanced, then click on Proceed to {instance hostname} (unsafe).
You can configure your own TLS certificate for the application by assigning a domain name owned by your organization to the EC2 instance's public IP address, then generating a TLS certificate to be used by G.V() at a specific location on your instance, as described in Configuring a TLS certificate
Authenticating to G.V()
By default, G.V() uses username/password authentication via Keycloak to secure access to its interface. The default credentials are as follows:
- Username: gdotv
- Password: the ID of your EC2 instance (e.g. i-0a25b19de55204410). You can find the ID of your EC2 instance from the EC2 console.
When navigating to G.V() while unauthenticated, you will be presented with the following login screen:
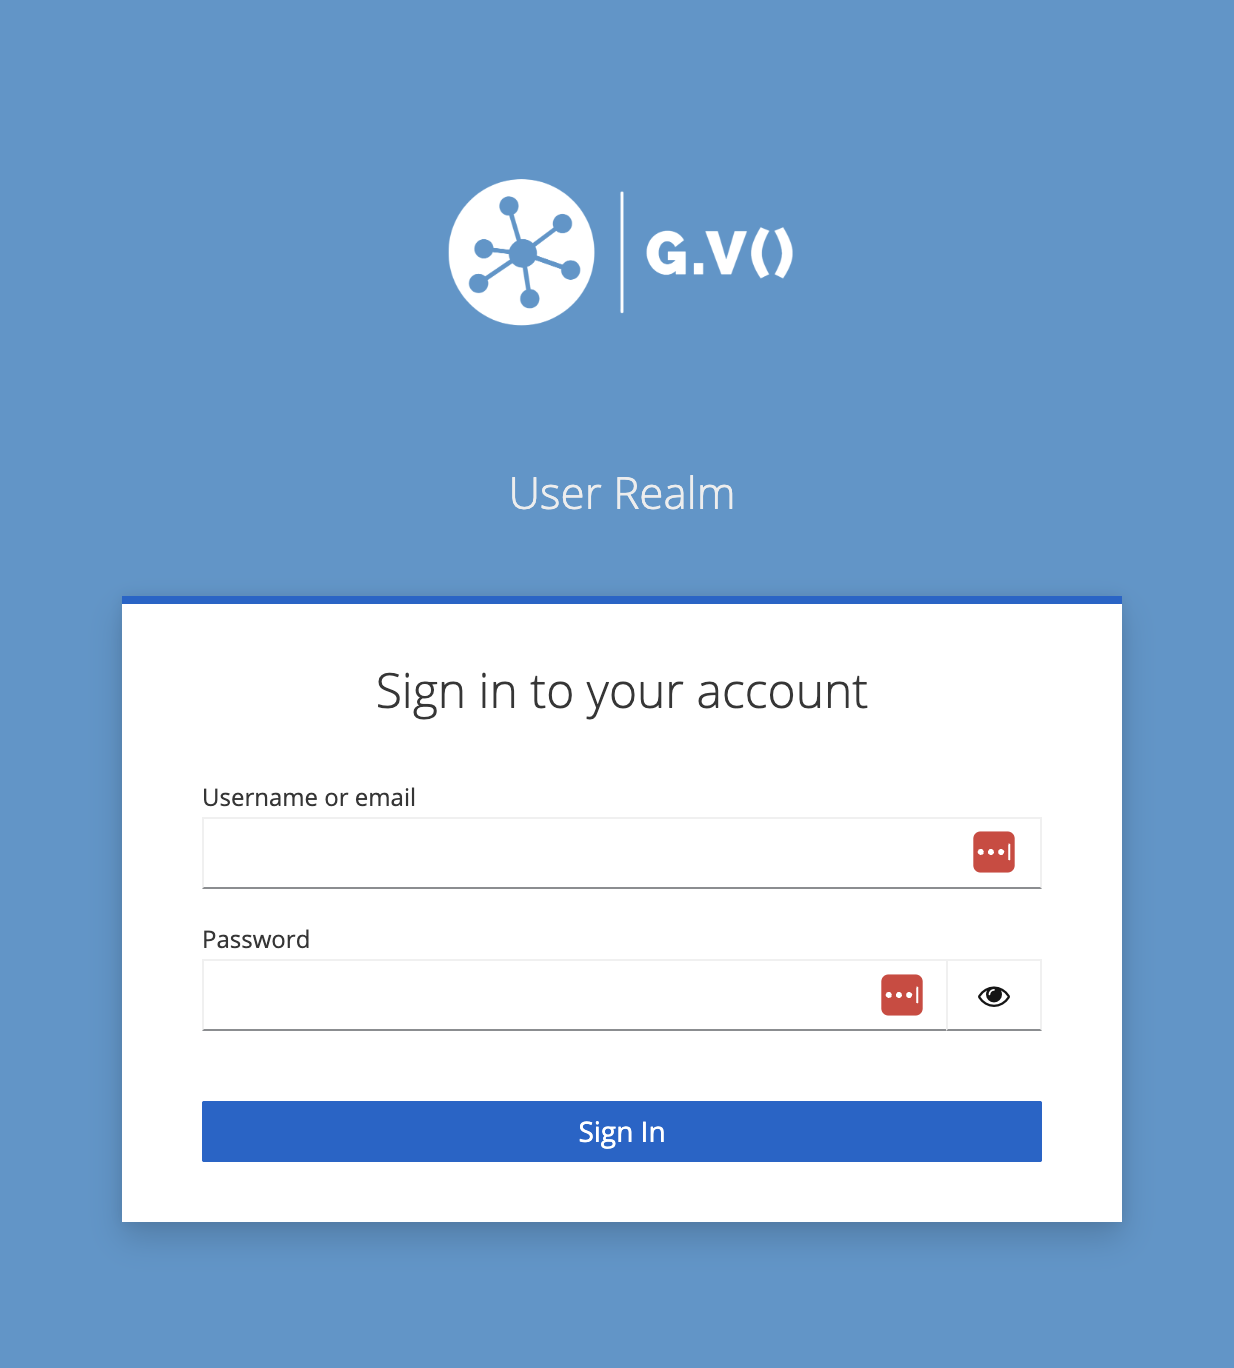
Keycloak is a powerful Identity & Access Management solution that provides user federation, management and authentication functionality. You can leverage these features to configure advanced authentication flows such as Single Sign On via your identity provider. For more details, please refer to the official Keycloak documentation.
In future versions of G.V(), we will be introducing further feature via Keycloak such as fine-grained access control.
We recommend that you change the default credentials after initial login. To do so, from the G.V() user interface, click on the top right menu bar (which will state your username, in this case gdotv). Then, select Change Password.
A new page will open showing the Keycloak profile management user interface. To update your password, click on Update under the Basic Authentication -> Password section.
Enter your new password and click Submit.
Authenticating to the gdotv Keycloak realm
The gdotv Keycloak realm is where all the G.V() users are stored and managed. New authentication flows, such as Single Sign On, can be configured directly from the gdotv Keycloak realm. The client configured to provide authentication to G.V() is gdotv-application, and can be accessed from within the realm UI when logged in as an administrator.
The gdotv Keycloak realm admin console can be accessed via: https://<ec2 hostname or configured G.V() hostname>/kc/admin/gdotv/console/
The default gdotv Keycloak realm credentials are as follows:
- Username: gdotv
- Password: the ID of your EC2 instance (e.g. i-0a25b19de55204410). You can find the ID of your EC2 instance from the EC2 console.
Authentication to the master Keycloak realm
The master Keycloak realm provides access to the master administration interface of Keycloak. Under normal circumstances, it should scarcely need to be accessed. However after initial deployment, we recommend that you log in to the master realm admin user and change its password.
The master Keycloak realm admin console can be accessed via: https://<ec2 hostname or configured G.V() hostname>/kc/admin/master/console/
The default master keycloak realm credentials are as follows:
- Username: gdotv
- Password: the ID of your EC2 instance (e.g. i-0a25b19de55204410). You can find the ID of your EC2 instance from the EC2 console.
To change your master realm password, you must first login using the instructions above.
Once logged in, click on the top right dropdown showing the admin username, then select Manage Account.
Go to the Account Security section, and select Signing in.
To update your password, click on Update under the Basic Authentication -> Password section.
Enter your new password and click Submit.
Configuring the IAM role for the instance
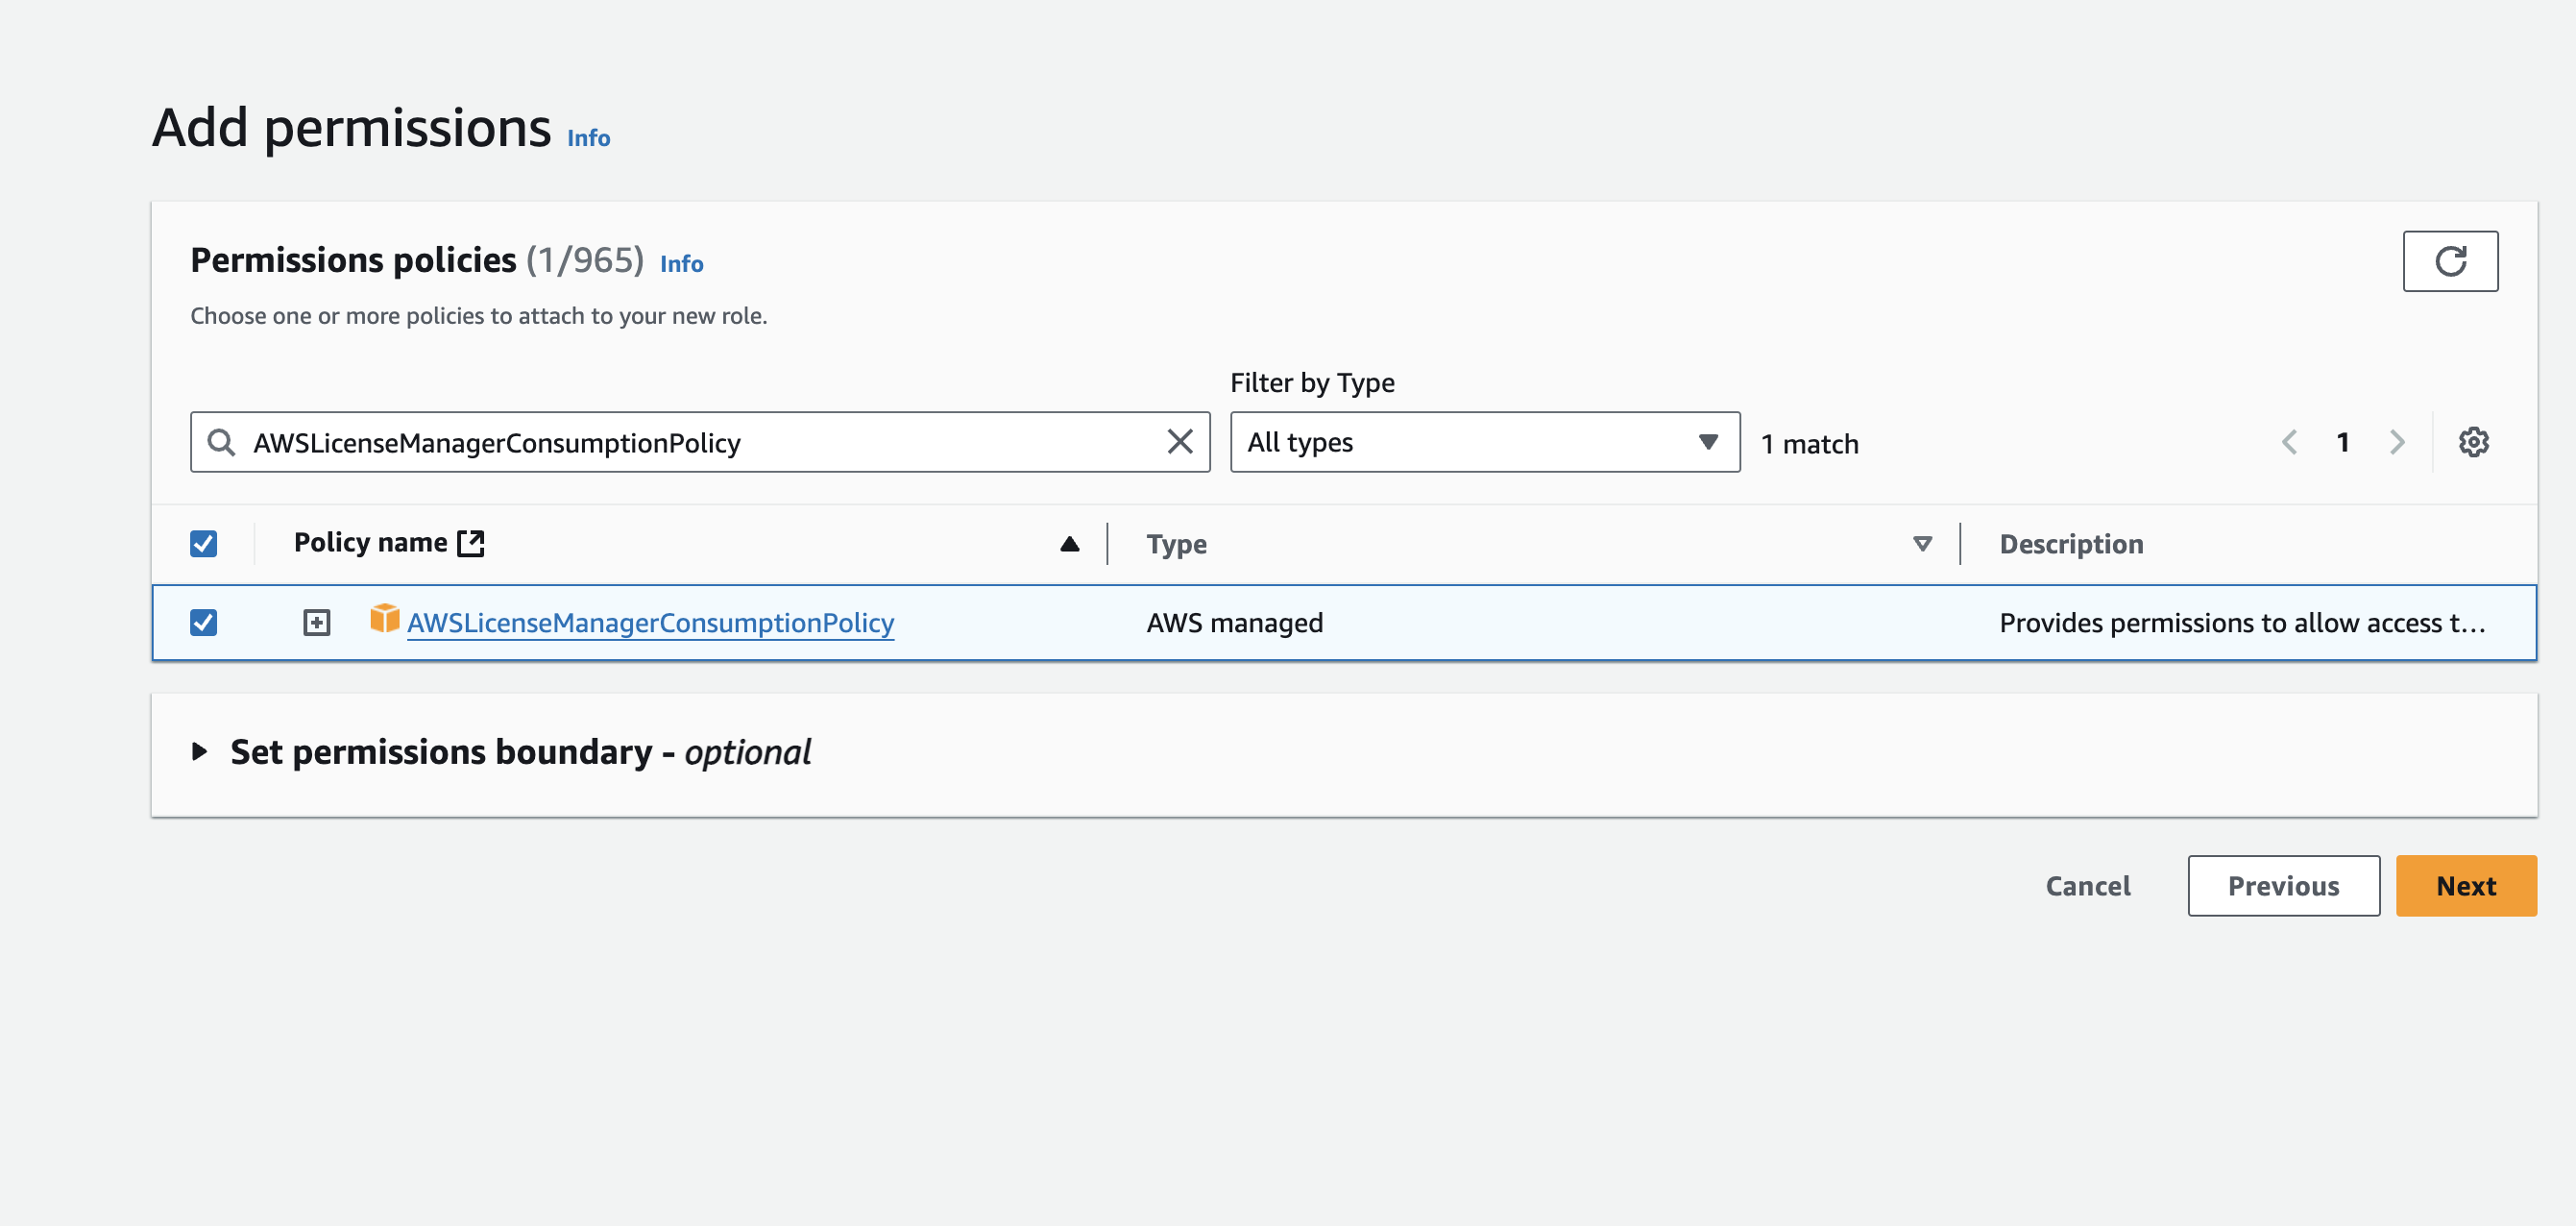
G.V() prefers (but does not require) that the EC2 instance has an IAM role with the AWSLicenseManagerConsumptionPolicy policy attached. This role is useful for G.V() to perform checks against AWS License Manager to ensure your license is valid and run from our AWS Marketplace AMI. This role can be further supplemented with policies to enable IAM access to your Amazon Neptune clusters and graphs with IAM authentication enabled, so we recommend taking this configuration step during the initial setup.
The role configuration is simple and should take no more than two minutes.
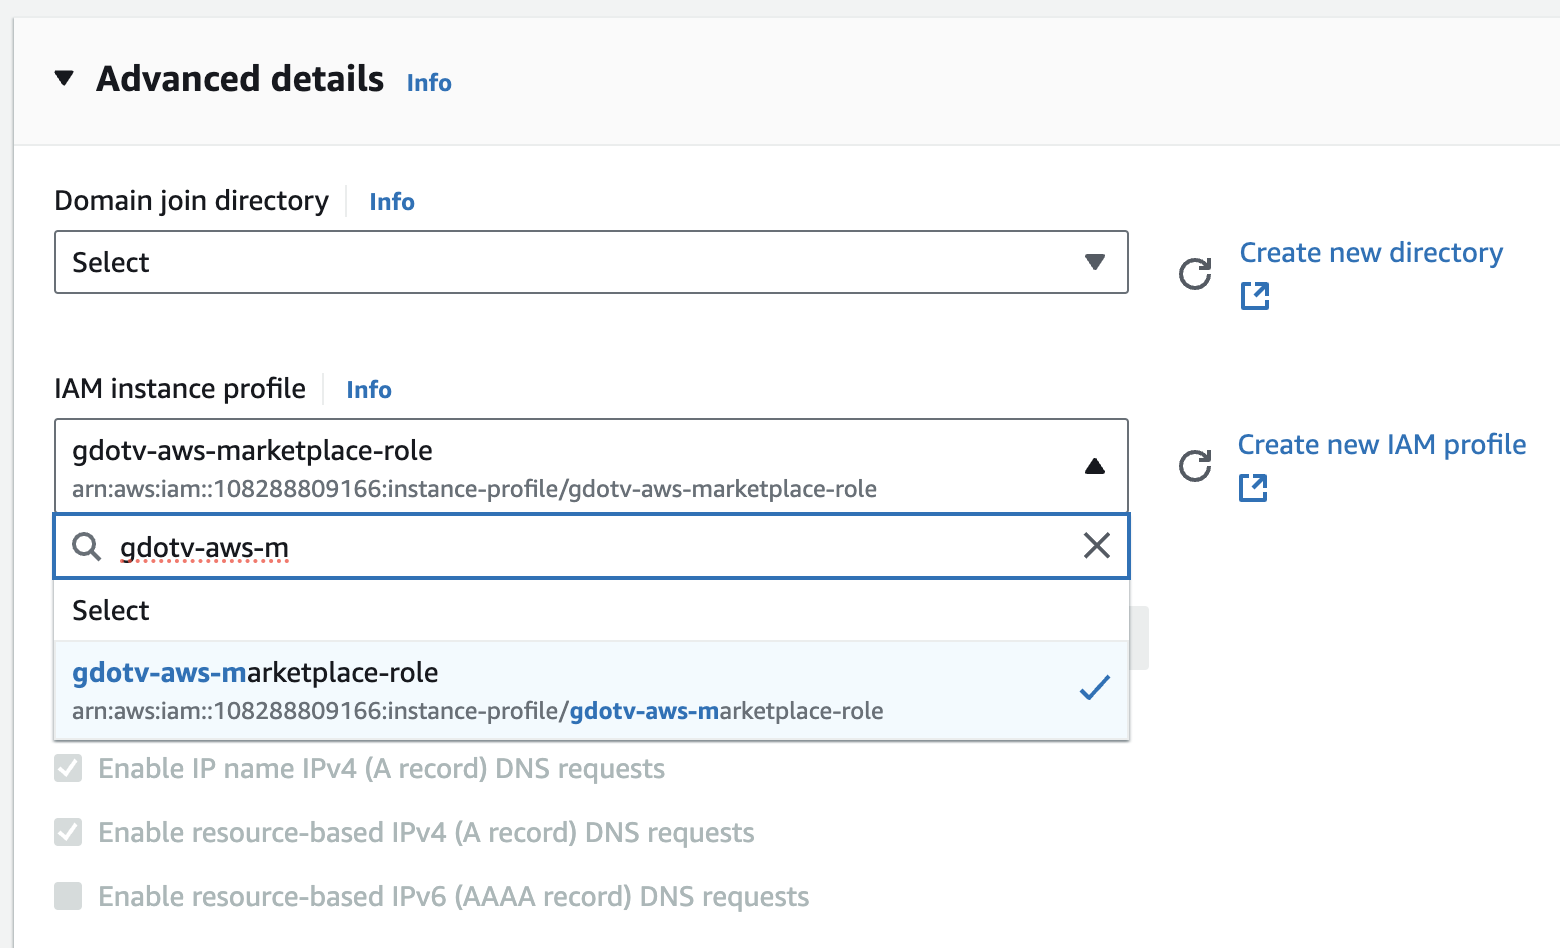
You'll be prompted to either select an existing IAM instance profile or create a new one. If you have previously created this instance profile, select it in the IAM Instance Profile dropdown. Otherwise, click on Create new IAM profile
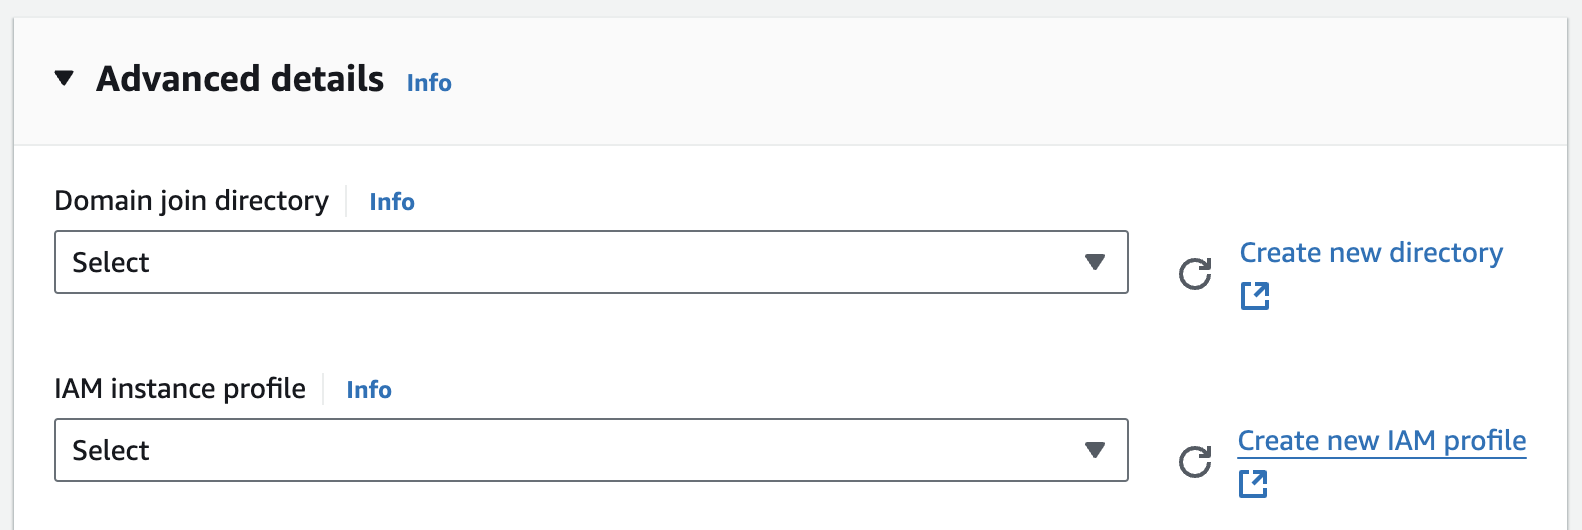
You'll be redirected to the Identity and Access Management (IAM) console. From there, click on Create role at the top right of the screen.
You'll next be prompted to select a Trusted entity type. Select AWS service, then under Use case, select EC2 in the Service or use case dropdown, and check EC2 under the Use case subsection, as shown below:
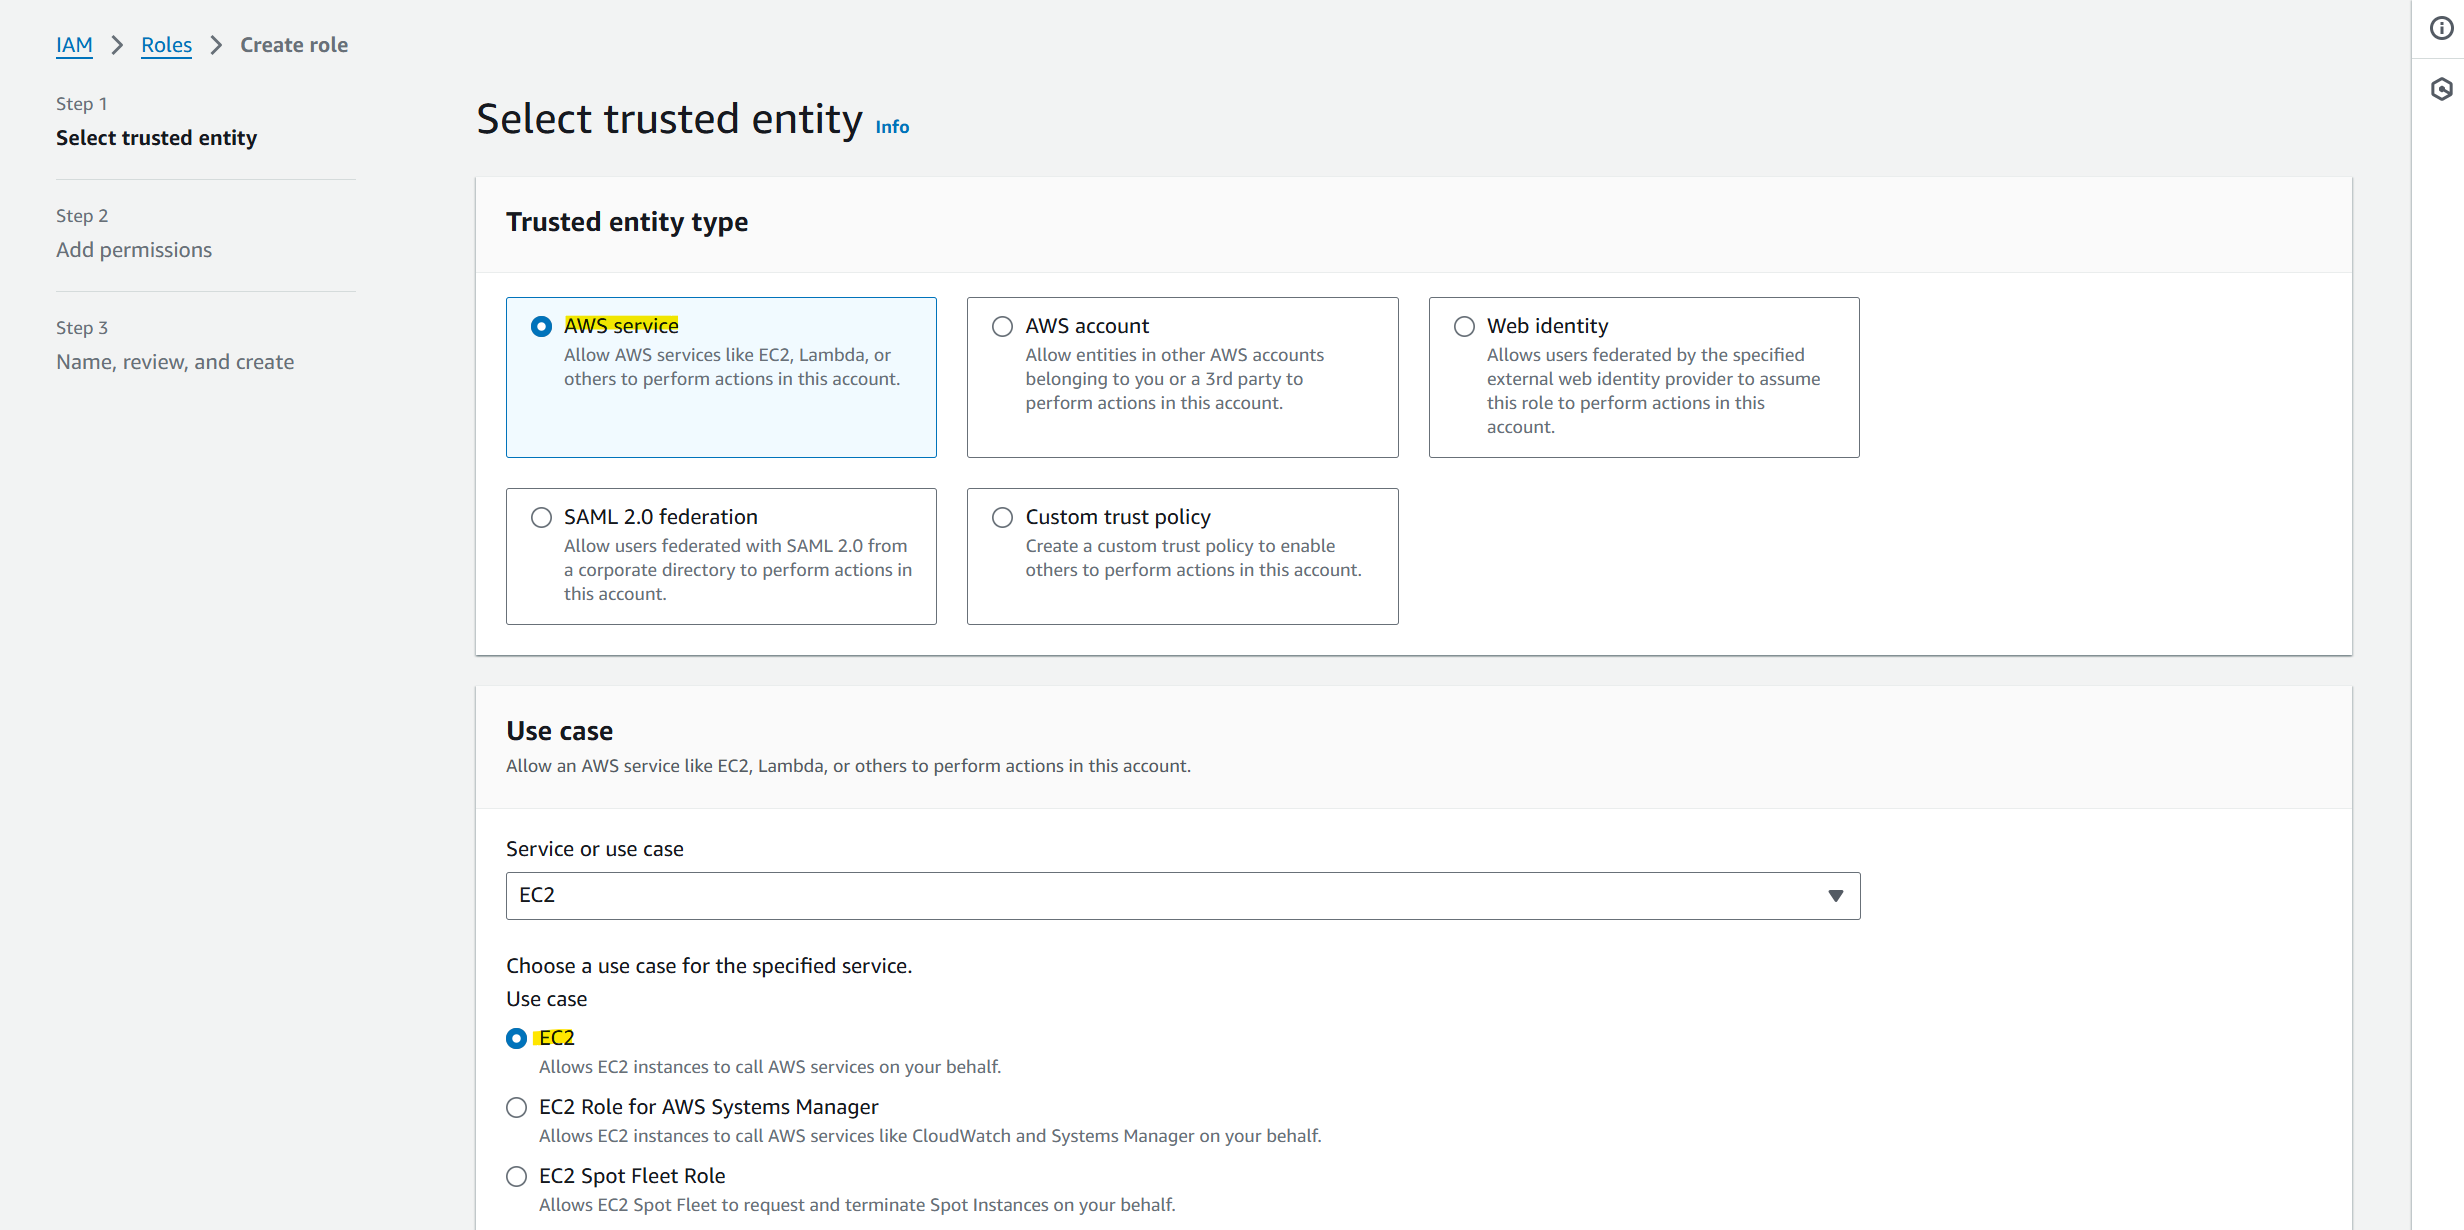
Click on Next. You'll now be prompted to add permissions to the new role. In the search bar, enter AWSLicenseManagerConsumptionPolicy, enable the policy and click on Next.
TIP
Configuring AWSLicenseManagerConsumptionPolicy access is optional, but since Amazon Neptune has its own IAM authorization policy requirements it is recommended to configure an authorization policy spanning Amazon Neptune permissions as well as license checks.
Adding permissions to one or more Amazon Neptune instance
Per Amazon Neptune's security guidelines, it is recommended to always enable IAM authentication on your database. If you're planning to use G.V() with an IAM-enabled Amazon Neptune instance, you can configure the EC2 instance's IAM profile to allow access to your database. Whilst adding permissions to your role, enable the following policies:
- NeptuneFullAccess: Provides the G.V() EC2 instance with access to your Amazon Neptune database instances. You can further restrict this access by filtering on the resources that are granted access using their ARN
- CloudWatchLogsReadOnlyAccess: Provides the G.V() EC2 instance with access to your Cloudwatch logs, enabling our Slow Query and Audit Logs functionality. This is entirely optional.
If you would prefer creating a more restricted and fine grained set of permissions to your Amazon Neptune DB instances and Amazon Neptune Analytics graphs, we recommend using the following JSON inline policy instead of AWS's NeptuneFullAccess default policy:
{
    "Version": "2012-10-17",
    "Statement": [
        {
            "Sid": "AllowPassRoleForNeptune",
            "Effect": "Allow",
            "Action": "iam:PassRole",
            "Resource": "*",
            "Condition": {
                "StringEquals": {
                    "iam:passedToService": "rds.amazonaws.com"
                }
            }
        },
        {
            "Sid": "AllowDataAccessForNeptune",
            "Effect": "Allow",
            "Action": [
                "neptune-db:*",
                "neptune-graph:*"
            ],
            "Resource": [
                "<ENTER COMMA SEPARATED LIST OF AMAZON NEPTUNE ARNs TO ALLOW G.V() READ/WRITE ACCESS TO>"
            ]
        }
    ]
}
Note that you will also be prompted to specify a name for the inline policy.
TIP
Make sure to replace the resource list in the policy above with your actual Amazon Neptune ARNs. Alternatively if you would like to grant access to all your Amazon Neptune databases, use:
"Resource": [
    "*"
]
We recommend always following your organization's best practice in security, which should mandate least privilege access to resources.
TIP
You can find your Amazon Neptune DB cluster ARN or Amazon Neptune Graph ARN from the Neptune console on the AWS website, under the Configuration section.
Your ARN should have the following structure: arn:aws:rds:{region}:{aws-account-number}:cluster:{neptune-cluster-name} (Amazon Neptune) arn:aws:neptune-graph:{region}:{aws-account-number}:graph/{graph-id} (Amazon Neptune Analytics)
Finally, you'll be prompted to set a name and description for the role. We recommend using the following values:
- Name: gdotv-aws-marketplace-role
- Description: Allows the G.V() AWS Marketplace AMI to perform license checkouts against AWS License Manager. It is also configured to read/write access to one or more Amazon Neptune instances, and their Cloudwatch logs. For more information, refer to https://gdotv.com/docs/aws-marketplace/#configuring-the-iam-role-for-the-instance
Once the name and description are set, click on Create Role.
Now that the role is created, you can return to the EC2 launch configuration page to select it. Note that you may need to refresh the role dropdown.
Connecting to your G.V() EC2 Instance via EC2 Instance Connect
The G.V() AWS Marketplace AMI has EC2 instance connect binaries installed by default, allowing you to SSH to it directly via the EC2 Console. To use EC2 Instance Connect, please refer to the official AWS documentation.
The username to use for EC2 Instance Connect is ec2-user.
Connecting to your G.V() EC2 Instance via SSH
To connect to your G.V() EC2 instance, you will need the SSH private key configured on your EC2 instance as stated in the EC2 console, as well as the hostname of the instance. You also need to ensure that your instance's inbound network rules allow you access to port 22 of the server.
The SSH username to use is ec2-user
From a terminal, run the following command:
ssh -i {path-to-ssh-private-key} ec2-user@{instance hostname}Once connected, you will be able to perform operations such as modifying your credentials, setting a new TLS certificate or upgrading G.V() to a new version.
Configuring a TLS certificate
By default, G.V() uses a self-signed certificate to serve its web interface over HTTPS. You may wish to configure your own trusted certificate, according to your organization's security policy.
To do so, copy your certificate public and private key files in PEM format to the following locations on the EC2 instance (assuming you are SSH'd in as ec2-user):
- Public Key: /home/ec2-user/gdotv/data/certs/<ec2 instance hostname or assigned G.V() hostname>/certificate.crt
- Private Key: /home/ec2-user/gdotv/data/certs/<ec2 instance hostname or assigned G.V() hostname>/private.key
Once the files have been replaced, you will need to restart the G.V() application for the changes to take effect. Whilst SSH'd to your EC2 instance as ec2-user, run the following commands:
/home/ec2-user/gdotv/scripts/stop-gdotv.sh
/home/ec2-user/gdotv/scripts/start-gdotv.sh
Startup of the application should result in a downtime of no more than 30 seconds.
Alternatively, you can reboot the EC2 instance itself from the EC2 console to restart the G.V() application.
There are other ways to configure a TLS certificate for G.V() - we recommend setting up an AWS Elastic Load Balancer with a custom hostname. For more information on Elastic Load Balancing on AWS, please refer to their official documentation.
Configuring a custom hostname for G.V()
For security reasons, Keycloak requires strict validation on its hostname. This means that if you're configuring a custom hostname for your G.V() deployment, you will also need to reflect this configuration change on G.V().
To do so, you will first need to SSH on your G.V() EC2 instance following the instructions at Connecting to your G.V() EC2 Instance via SSH.
Once you're SSH'd to your instance, navigate to the gdotv/scripts folder by running:
cd gdotv/scriptsYou will need to modify the generate-env-variables.sh script to state the custom hostname you're using. vi comes preinstalled on the instance and can be used to edit the file.
The GDOTV_HOSTNAME environment variable determines the hostname G.V() is being served under, and is assigned to the EC2 instance's public hostname by default. Update generate-env-variables.sh and modify this line as follows:
export GDOTV_HOSTNAME=<custom hostname> # $AMI_PUBLIC_HOSTNAMEThe custom hostname should not include any port or protocol, e.g. application.gdotv.com
Once the value has been updated, you will also need to restart G.V() for the change to take effect. To do so, from the same folder, run:
./stop-gdotv.shOnce the command is complete, then run:
./start-gdotv.shStartup may take up to a couple of minutes. If you've recently created the hostname DNS record, make sure that it is propagated and can be resolved via DNS before restarting G.V().
To revert the change, follow the same steps described, setting the GDOTV_HOSTNAME environment variable value back to $AMI_PUBLIC_HOSTNAME.
Upgrading to a new version of G.V()
G.V() receives frequent updates with new features and improvements. We recommend keeping up to date with the latest version.
Upgrading your G.V() version is a straight forward process that can be achieved in a few minutes. There are two types of upgrades you may need to perform:
- Container updates: updates to the G.V() software itself by means of pulling the latest version of our Docker image
- Amazon Machine Image (AMI) updates: updates to the AMI wrapping the G.V() deployment, for access to the latest security and feature patches from Amazon Linux 2023
Performing a container update
To perform a container update, take note of the latest version number for G.V(), as stated in the update announcement email from AWS, which should be in the x.y.z format.
SSH into your G.V() EC2 instance as ec2-user, with the key pair associated with your EC2 instance as described in Connecting to your G.V() EC2 instance via SSH.
Run the following commands:
echo "{new-gdotv-version-number}" ? /home/ec2-user/gdotv/conf/gdotv_version
cd /home/ec2-user/gdotv/scripts
./stop-gdotv.sh
./start-gdotv.sh
Once the application is restarted, you can continue using G.V() on the latest version directly from your browser.
Performing an AMI update
To perform an AMI update, you will first need to deploy a new EC2 instance for G.V() following the instructions at Deploying a G.V() instance.
Once the new instance is deployed, you need to migrate the G.V() database files to the new instance. This involves copying the local database storage files from the old instance to the new one. The database storage files contain user preferences and database configurations, as well as saved queries, folders and stylesheets.
Follow these steps to migrate the data:
- SSH into your old EC2 instance as ec2-user
- Stop the G.V() application by running the following commands:
cd /home/ec2-user/gdotv/scripts && ./stop-gdotv.sh- Navigate to the Postgres data folder:
cd /home/ec2-user/gdotv/data - Compress the postgres-data directory:
sudo tar -zcvf postgres-data.tar.gz postgres-data - Transfer postgres-data.tar.gz to your new instance, either directly between EC2 instances, or via your local machine, as detailed below:
- Copy the database backup from the old instance to your local machine:
scp -i {private-key-ssh-file} ec2-user@{old-instance-hostname}:/home/ec2-user/gdotv/data/postgres-data.tar.gz . - Copy the database backup from your local machine to the new instance:
scp -i {private-key-ssh-file} postgres-data.tar.gz ec2-user@{old-instance-hostname}:/home/ec2-user/gdotv/data/postgres-data.tar.gz
- Copy the database backup from the old instance to your local machine:
- SSH into your new EC2 instance and stop the G.V() application as instructed above.
- Remove the current postgres-data folder in the new EC2 instance:
sudo rm -r /home/ec2-user/gdotv/data/postgres-data - Unzip the copied postgres-data.tar.gz file:
tar -xvzf postgres-data.tar.gz - Restart the G.V() application:
cd /home/ec2-user/gdotv/scripts && ./start-gdotv.sh
Your data has been successfully migrated to the new instance. Terminate the old EC2 instance to finalize the upgrade. Note that the password on the new EC2 instance will be reset to the instance ID by default, so you may need to change the password following instructions at Modifying the G.V() authentication credentials
Upgrading from version 3.27.63 to version 3.34.79 or above
From version 3.34.79, we have introduced a new architecture for the application that leverages Keycloak, to provide advanced authentication and user federation capabilities. Due to the architecture change, performing a simple container update is not sufficient to upgrade from version 3.27.63 (or below) to version 3.34.79 (or above).
In order to perform a full upgrade to version 3.34.79 or above, you need to follow the instructions at Performing an AMI update
Backup and restore data
We recommend backing up your G.V() data regularly in the event of a failure in region or availability zone to allow you to quickly recover from such a scenario. There are two approaches you can take to backup and restore G.V() data which we describe below.
Backup and restore using EBS snapshots
The simplest way of configuring a backup process for the G.V() application is to schedule regular EBS snapshots for the root volume of the G.V() EC2 instance.
Doing so allows you to backup all database and configuration files on the root volume and easily restore them to a separate EC2 instance (or the current) one using the EC2 console's built-in EBS snapshot functionality.
This process is described in details in the official EC2 documentation.
Backup and restore using S3
An alternative method to backup and restore G.V()'s database is to regularly copy the Postgres data to an S3 bucket which can be used to restore the data from.
For more details on how to access the G.V() instance's Postgres data please refer to Performing an AMI Update in which we outline a process to transfer data between instances.
Troubleshooting
The application is not accessible over port 443
Failure to reach the G.V() web application can be due to:
- an inbound network configuration on your EC2 instance not allowing or blocking access to port 443. To check what rules are configured on your EC2 instance, refer to [https://docs.aws.amazon.com/AWSEC2/latest/UserGuide/ec2-security-groups.html].
- one or more G.V() application containers being stopped. Rebooting the EC2 instance will restart the application. Should the issue persist, contact us at support@gdotv.com.
The application is stating that AWS Marketplace License Validation failed
Should the EC2 instance be misconfigured and not permit access to AWS License Manager for license verification purposes, clear instructions will be displayed directly on the G.V() application stating the nature of the issue and steps to remediate.
For more details on how to configure G.V() at launch to allow license validation, check Configuring the IAM role for the instance
Additional support
For any support queries, email us at support@gdotv.com. Support is free and we answer all queries within one business day.