Connection Management
Create a Connection
To create a connection, click on "Connect A Database" from the welcome screen or the top of the Connections sidebar on the left. You will be presented with the following screen:
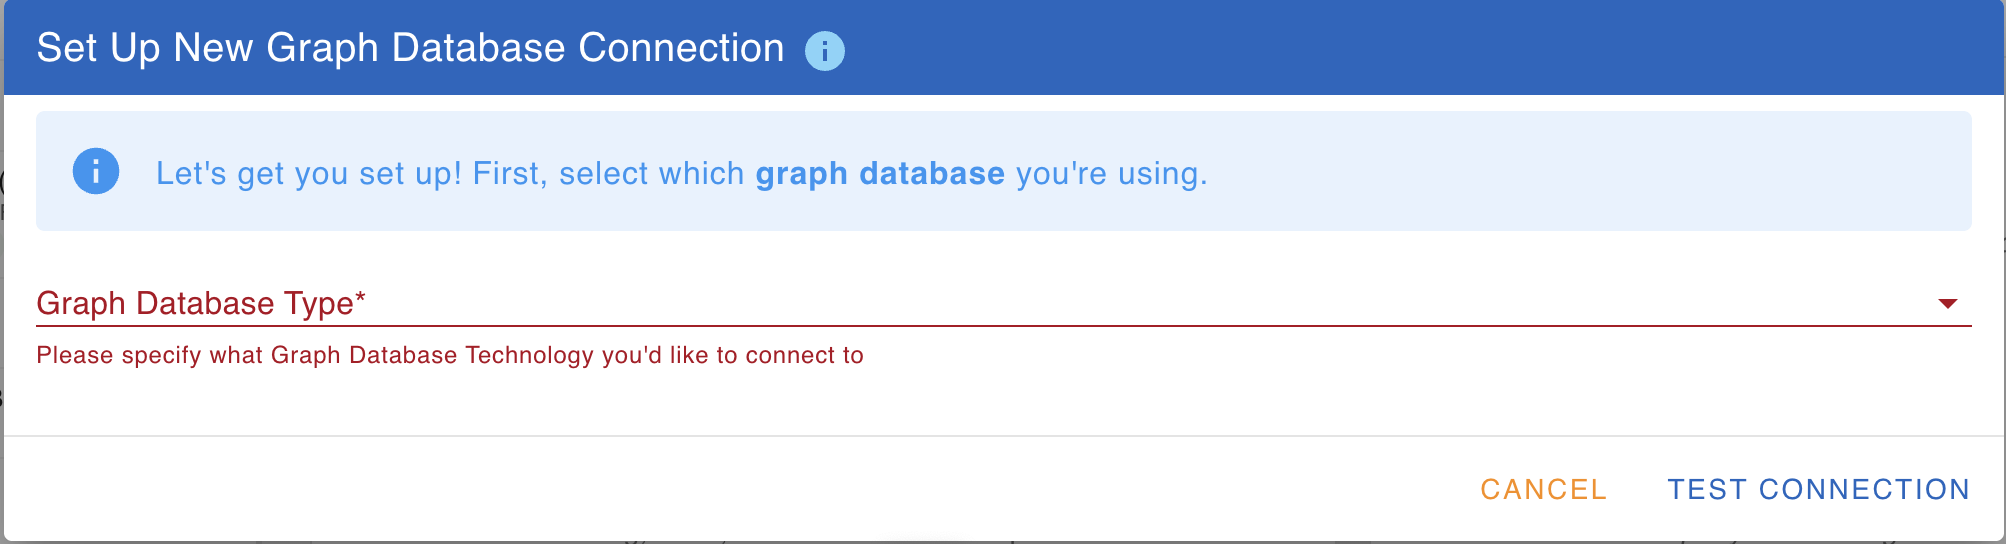
You will first be prompted for a Graph Database Connection Type (e.g. JanusGraph, Amazon Neptune, etc), then credentials such as hostname and port or SPARQL endpoint (depending on the connection type) to use to connect to your database. gdotv will attempt to connect to your database automatically and will perform a number of verifications. Should connection fail, you will be advised of next steps to take or additional values to enter, for instance credentials, AWS IAM Authentication details, or an SSL certificate.
TIP
As gdotv progresses in setting up your connection and discovers its requirements, it will display a list of steps indicating how far to go before the connection is complete. For instance, gdotv will evaluate if network connectivity to your database host can be established first, and then detect next steps such as "Provide Credentials" or "Complete SSL Configuration" as required by your database provider.
TIP
gdotv is designed to make your database connection onboarding as easy and effortless as possible. However if despite that you're struggling to connect your database using gdotv, don't hesitate to drop us an email over at support@gdotv.com, we'll be happy to assist you.
Create a Connection (Advanced Settings)
To create a connection, click on "Connect a Database" from either the home screen or the top of the Connections sidebar on the left. Select which graph database you're using, then click on "Advanced Settings". You will be presented with the following screen:
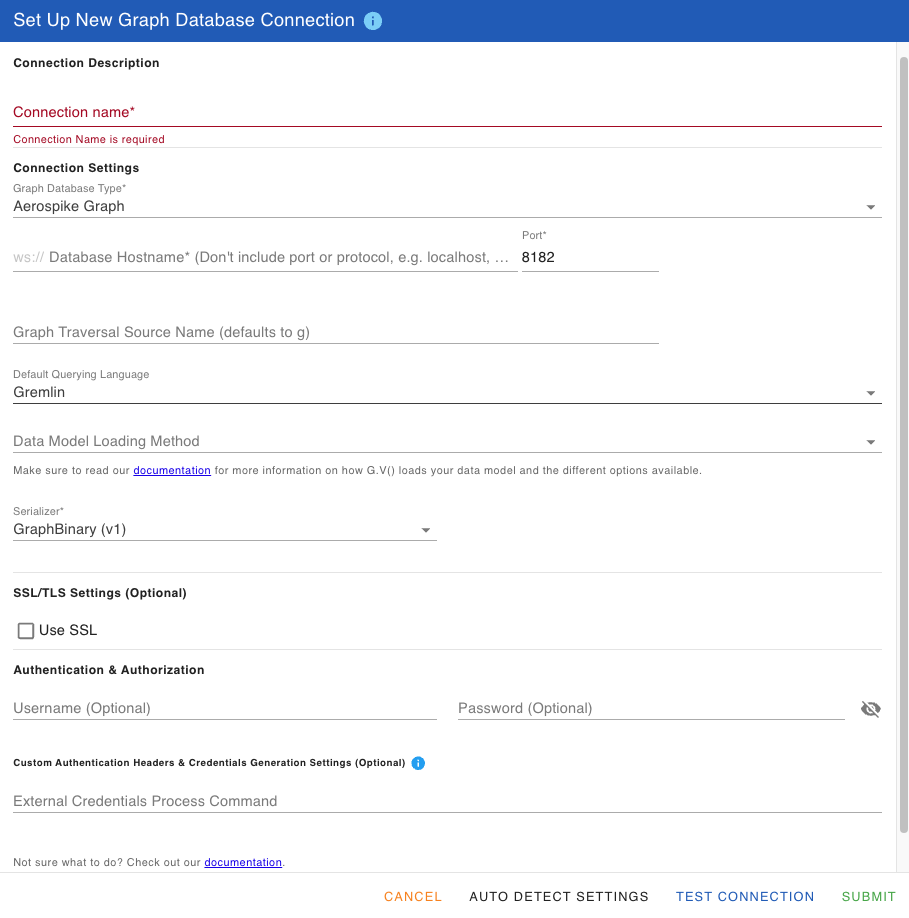
The fields are as follows:
- Connection name (Required): A friendly name for your connection, used for display purposes
- Graph Database Type (Required): Specify which underlying database technology is used for your server. Certain database technologies require additional configuration fields, as documented below. Selecting the database technology you're connecting to ensures you are provided with the adequate configuration fields to successfully connect to it.
- Hostname (Required): The Hostname for your server, specified without any protocol
- Port (Required): The port number of your Gremlin Server, 8182 by default
- Graph Traversal Source Name / Repository / Namespace / Dataset / Data Store: The top-level graph container to execute queries against. For Apache TinkerPop (Gremlin) databases this is the name of the GraphTraversalSource binding (defaults to
g). For Cypher/Bolt databases it is the database name. For RDF triplestores this concept maps to a repository (RDF4J, GraphDB, AllegroGraph), a namespace (Blazegraph), a data store (RDFox) or a dataset (Apache Jena Fuseki). Using automatic connection detection, gdotv will query each provider's management API to discover available containers, and when only one exists, auto-select it. When multiple containers are found you will be prompted to choose one before the connection is established. You can also change the active container at any time from the Edit Connection dialog. For providers where this concept does not apply (e.g. Amazon Neptune SPARQL, QLever) this field is not shown. - Default Querying Language: Sets the default query language to be used when opening new query tabs, for database variants that support multiple languages.
- Use SSL (Required): If connection over SSL is required, please check this option.
- SSL Root CA Certificate (Optional): When using your connection over SSL, please supply the root CA Certificate file for your SSL certificate in .pem format. Note that the Amazon Neptune Root CA Certificate comes pre-loaded in gdotv.
- Ignore SSL Validation: If SSL is enabled for your connection, allows ignoring client-side SSL warnings to connect directly without supplying a SSL Root CA Certificate
- Serializer (Required): The serializer to use with the connection. Please ensure you specify a serializer that is compatible with your Gremlin Server. If in doubt over which available serializers are available, check your Gremlin Console remote connection YAML file.
- OR Database Name: For Cypher/Bolt based databases, the name of the graph configured on the database to connect to and query from. Using automatic connection detection, gdotv will determine available database names for your DB and offer to select one.
- Username (Optional): If credentials are required for your database, please specify a valid username
- Password (Optional): If credentials are required for your database, please specify a valid password for the username previously supplied.
- Remember Password (Optional): If credentials are required for your database, you can optionally save the password in gdotv to avoid re-entering it for each subsequent use. If disabled, you will be prompted during each gdotv session to enter the database password when attempting to write a query.
Once you have filled the required information in the form, you will be able to either test the connection by clicking on "Test Connection" or saving it by clicking "Submit".
Amazon Neptune Configuration Fields
When specifying your Graph Database Variant as Amazon Neptune, the following additional fields will be available:
- AWS Access Key ID (Required with Use IAM Authentication Enabled): Your AWS IAM User's Access Key ID
- AWS Access Secret Key (Required with Use IAM Authentication Enabled): Your AWS IAM User's Access Secret Key
- AWS Service Region (Required with Use IAM Authentication Enabled): Your AWS IAM User's Service Region
- Load AWS IAM Credentials via AWS CLI Profile: Enable this option to fetch your AWS IAM Credentials directly via a pre-configured AWS CLI profile. This option is required to automatically refresh credentials from a Single Sign-On enabled AWS IAM User Account. Note that gdotv will be looking for profiles in the default credentials configuration file location.
- AWS CLI Profile Name (Load AWS IAM Credentials via AWS CLI Profile): The name of the AWS IAM CLI profile to fetch AWS IAM Credentials from.
- Use AWS Temporary Credentials: If you intend to connect to Amazon Neptune using Temporary Security Credentials, please check this option to be prompted for your session token
- ARN Role To Assume (Required with Use AWS Temporary Credentials): AWS ARN Role to Assume using the Access Key ID/Access Secret Key/Service Region to generate STS token under the role specified when connecting to the Neptune database. This can allow for instance to run queries that interact with other AWS services, e.g. OpenSearch for FTS queries.
- Use Proxy: If you are connecting to your Amazon Neptune behind a manually configured Nginx or HAProxy proxy, and you are using IAM credentials, check this option to enter your Amazon Neptune endpoint hostname. This is required for IAM DB authentication as requests to Amazon Neptune must be signed with a host header containing the actual Amazon Neptune endpoint rather than the proxy hostname.
- Amazon Neptune Hostname (Required with Use Proxy): If use Proxy is enabled, enter your Amazon Neptune hostname behind your proxy configuration here (e.g. database-1.cluster-cnwch6byw8sx.eu-west-2.neptune.amazonaws.com)
- I want to specify a Session Token directly (Optional with Use AWS Temporary Credentials): If you enable this, you will be prompted for a Session Token that you can input directly as opposed to generating AWS Temporary Credentials via an ARN Role To Assume.
- AWS Session Token (Required with I want to specify a Session Token directly): The temporary AWS Session Token to use to connect to your database. Note that the token will need to match the AWS Access Key ID/Secret Key generated alongside the generated temporary session token and will need to be refreshed manually when the credentials expire.
TIP
If your Amazon Neptune Database requires the use of AWS IAM credentials, gdotv will automatically detect it and attempt to load existing credentials via the DefaultAWSCredentialsProviderChain as described in Provide temporary credentials to the AWS SDK for Java
You can also specify a different AWS CLI profile to fetch credentials from, including (but not limited to) Single Sign-On profiles to automatically refresh credentials.
Establishing Connectivity to your Amazon Neptune Database
Your Amazon Neptune Database is hosted in a privately hosted VPC (Virtual Private Cloud) which is not normally accessible except by machines within that same VPC. Additionally, machines within the same VPC as your Amazon Neptune cluster need to be allowed to connect on port 8182.
gdotv comes bundled with the SFSRootCAG2 Root certificate required to securely connect over SSL with Neptune.
For guidance on how to configure an SSH tunnel to your Amazon Neptune Database, please refer to sections 1 and 2 of https://github.com/aws/graph-notebook/tree/main/additional-databases/neptune gdotv is also compatible with connecting to Amazon Neptune in the following ways:
- Via a manually configured nginx or haproxy proxy
- Via AWS VPN
- Via AWS Application or Network Load Balancer
- Via direct connectivity from the Amazon Neptune VPC or from a VPC linked to your Amazon Neptune VPC
I'm getting a "hostname could be found but connection timed out" error
gdotv has a 30 seconds timeout when attempting to connect to your database. Very often with Amazon Neptune a connection timeout if you're using an SSH tunnel through to Amazon Neptune, it can indicate two things:
- The SSH tunnel itself is not open
- The SSH tunnel to your EC2 instance is open but your EC2 instance cannot connect to your Amazon Neptune cluster, usually due to Security Group/Networking restrictions.
A useful test to confirm your Amazon Neptune cluster is reachable from your device is to open a browser and navigate to:
https://YourNeptuneEndpoint:8182/status
You should see a report, similar to the one below, indicating the status and details of your specific cluster:
{
  "status": "healthy",
  "startTime": "Wed Nov 04 23:24:44 UTC 2020",
  "dbEngineVersion": "1.0.3.0.R1",
  "role": "writer",
  "gremlin": {
    "version": "tinkerpop-3.4.3"
  },
  "sparql": {
    "version": "sparql-1.1"
  },
  "labMode": {
    "ObjectIndex": "disabled",
    "DFEQueryEngine": "disabled",
    "ReadWriteConflictDetection": "enabled"
  }
}
If the report isn't showing, this strongly suggests your device is not able to reach your Amazon Neptune cluster, and you should focus on investigating why that is.
Apache AGE Connection String
The Connection String field accepts either a JDBC or a libpq-style PostgreSQL connection string. If a libpq string is entered, gdotv will automatically convert it to the JDBC form and populate the Username and Password fields (if they are empty) from the credentials embedded in the string. Any extra parameters (e.g. sslmode) are preserved as JDBC query parameters.
JDBC examples:
jdbc:postgresql://localhost:5432/mydb
jdbc:postgresql://db.example.com:5432/graphdb?sslmode=require
libpq examples (URI form):
postgresql://alice:secret@db.example.com:5432/graphdb
postgresql://db.example.com:5432/graphdb?sslmode=require
libpq examples (key/value form):
host=db.example.com port=5432 dbname=graphdb user=alice password=secret
host=db.example.com port=5432 dbname=graphdb sslmode=require
When a credentialed libpq string such as postgresql://alice:secret@db.example.com:5432/graphdb?sslmode=require is pasted, the field will be rewritten as jdbc:postgresql://db.example.com:5432/graphdb?sslmode=require, with alice and secret moved into the Username and Password fields. Existing values in those fields are never overwritten.
Apache AGE Authentication Configuration Fields
When using Apache AGE on Azure Database for PostgreSQL, you will be given the option to configure EntraID authentication via the Azure CLI. The following advanced settings fields are available as part of the configuration:
- Azure Tenant ID (Optional): The tenant ID to authenticate under, if using multiple Azure tenants.
- Azure AD Username (Optional): The Azure AD Username to authenticate with when using a managed identity.
- Use EntraID Managed Identity (Optional): Enables running in Azure with managed identity configured. The username field above should contain the managed identity client ID.
Azure Cosmos DB Configuration Fields
When specifying your Graph Database Variant as Azure Cosmos DB or Azure Cosmos DB Emulator, the following additional fields will be available:
- Azure Cosmos DB Auth Key: Your Azure Cosmos DB Primary Key as shown on your account under Settings - Keys.
- Azure Cosmos DB Database Name: The Database ID of your Azure Cosmos DB account
- Azure Cosmos DB Collection Name: The Collection Name of your graph
Dgraph Cloud Configuration Fields
To connect to Dgraph Cloud, you will need the following:
- Hostname: The hostname of your Dgraph Cloud instance, e.g. nameless-brook-670165.eu-central-1.aws.cloud.dgraph.io
- gRPC Port: The port of your instance, which should be 9080
- API Key: An API Key for your Dgraph Cloud instance which grants access to querying it. To view and manage Dgraph Cloud API keys, refer to their documentation
Kuzu/LadybugDB Configuration Fields
When connecting to Kuzu or LadybugDB, gdotv always uses the on-disk mode. To connect to your Kuzu/LadybugDB dataset, you only need to specify two parameters:
- Kuzu/LadybugDB Database File: The location of your Kuzu/LadybugDB database file.
- Connect to Kuzu/LadybugDB in Read Only Mode: If enabled, your Kuzu/LadybugDB database will be open in read-only mode.
- Release Kuzu/LadybugDB Lock after each operation: If enabled, each time gdotv is done performing a query or an operation against your database, it will immediately release the Kuzu/LadybugDB database lock, allowing other applications to connect to your instance.
TIP
The Kuzu/LadybugDB database lock can also be released manually from the Connection sidebar by clicking Release Database Lock from under your Kuzu/LadybugDB database connection item.
To find out more about Kuzu, check out their Getting Started documentation.
To find out more about LadybugDB, check out their Getting Started documentation.
Google Spanner Graph Configuration fields & Authentication
Authentication
When connecting to a Google Cloud Spanner Graph database, authentication is required via the Google Cloud CLI. To configure authentication via the gcloud CLI, please follow these instructions. You should install the gcloud CLI on the host or desktop you're running gdotv from in order to authenticate to Google Cloud Spanner Graph.
You can optionally specify a Custom Application Default Credentials file path manually. The file path should point to a valid Application Default Credentials (ADC) file, as documented in the official Google Cloud documentation.
When running gdotv on GKE (e.g. via the Google Cloud Marketplace), authentication is handled through Workload Identity instead. For setup instructions, see the Google Cloud Marketplace Workload Identity documentation.
gdotv will automatically inform you of any error or misconfiguration of authentication when configuring connection to your Spanner Graph instance.
Configuration Fields
Additionally, the following configuration fields will be required to determine which database to connect to:
- Project Id: The Google Cloud Project Id your Google Spanner Instance belongs to
- Spanner Instance Id: The Google Spanner Instance name to connect to
- Spanner Database Id: The Google Spanner Database name to connect to
Kerberos Authentication Configuration Fields
If your Graph Database requires Kerberos Authentication, you can configure gdotv to use the "GSSAPI" SASL mechanism to fulfill this authentication requirement, as documented on the official Apache TinkerPop documentation. There are 4 main components that you need to address in order to use Kerberos configuration in gdotv, in line with standard requirements for Java based Kerberos authentication, which we describe below:
- Access to a valid krb5.conf configuration file: gdotv will attempt to fetch your krb5.conf file from two separate locations, in order. First, from the java.security.krb5.conf Java Environment Variable, and if not found, from the KRB5_CONF environment variable. If neither are set, you will be prompted to set the java.security.krb5.conf Java Environment Variable for gdotv.
- Access to a valid JAAS Configuration file: gdotv will attempt to fetch your JAAS Configuration file from the java.security.auth.login.config Java Environment Variable. If not found, you will be prompted the set the java.security.auth.login.config Java Environment Variable for gdotv.
- A JAAS Entry name value that matches the ones set in the JAAS Configuration file.
- A Kerberos Service name value that matches the one configured on your graph database.
TIP
Kerberos Authentication configuration is only available for Apache TinkerPop graph databases that support Kerberos Authentication.
Fetch Credentials or Authentication Headers via Custom Credentials Process
Sometimes, using a Kerberos, a username/password combination or proxy credentials to authenticate to your database is not enough. In order to support complex authentication credentials use cases, gdotv allows loading credentials to use when establishing connection to the database via an external process that can be spawned to fetch credentials details or custom headers to include with every request to the database.
You can configure this under Advanced Settings of your connection via the Custom Authentication Headers & Credentials Generation Settings section, which will prompt you for an External Credentials Process Command.
The External Credentials Process Command is the process, executable or console script (think Command Line Interface) gdotv will run locally on your device to fetch your credentials to be included in your database requests. For gdotv to exploit the results of this command line interface, it needs to output a specific JSON format to stdout upon successfully running, which gdotv can they parse your credentials out of. The JSON format is as follows:
{
  "headers": // An optional dictionary of headers where the key denotes the name of the header, and the value denotes the value of the header, e.g. "Authorization": "Bearer mySecretToken"
    {
      "header1": "value1",
      "header2": "value2"
    },
    "username": "user", // An option username to use as part of the Gremlin Driver configuration to authenticate to your database
    "password": "passwd", // An option password to use as part of the Gremlin Driver configuration to authenticate to your database
    "expiry": 1718378988 // An optional expiry date in UNIX timestamp format and in UTC time zone specifying the expiry date for the JSON output (and the credentials it contains).
                                              // If not specified, the credentials will only be fetched once, otherwise gdotv will refresh the credentials when necessary via the External Credentials Process Command

}
Consider the following example python script execution command:
python C:\Users\ArthurBigeard\Documents\customWebSocketRequestModifier.py"With the following code:
from datetime import datetime, timedelta, timezone
import json
import calendar

now = datetime.now(timezone.utc)
now_plus = now + timedelta(hours = 1)
print(json.dumps({
    # Headers, username, password and expiry are all optional - in some cases you may need credentials, in others a custom header such as an Authentication header.
    # This depends on the authentication requirements of your database and your custom process's output should reflect these requirements
    "headers": {
        "myCustomheader1": "Hello!"
    },
    "username": "root",
    "password": "playwithdata",
    "expiry":calendar.timegm(now_plus.utctimetuple())
}))
WARNING
The script/executable should only write the required JSON output to stdout. This means that you should avoid the use of print statements otherwise these will also be captured by gdotv which will then attempt to parse them.
The above script should be configured to be called by gdotv using the python script execution command above, and will output the following JSON for gdotv to parse when executed:
{
  "username":"root",
  "password":"playwithdata",
  "expiry": 1718378988
}
This will instruct gdotv to specify root as the database username, playwithdata as the database password, and that these credentials will be valid until 2024-06-12 at 15:03:46, at which point gdotv will need to rerun python C:\Users\ArthurBigeard\Documents\customWebSocketRequestModifier.py to fetch the credentials anew.
gdotv can run any executable as long as it doesn't require direct user interaction, e.g. a Command Line Interface that prompts for user credentials. You can however have your command line interface start and idly wait on another process from which you can prompt user interaction or instruct user to take a specific action, for instance logging in to a specific website.
TIP
Custom credentials process is only available for Apache TinkerPop based graph databases.
Testing the output of your custom credentials process
To help make sure that your custom credentials process is outputting the expected format, you will be given the option to let gdotv run your process by clicking on "Check Command Output". If the command is successful and outputting the expected format, the results will be displayed underneath. If the command fails to run or its output cannot be parsed to JSON, an error message will be displayed to assist with troubleshooting.
Connection List
Your saved connections will be displayed on the left of your screen, as shown in the screenshot below. You can toggle the connection sidebar by clicking on or at the top left of the screen.
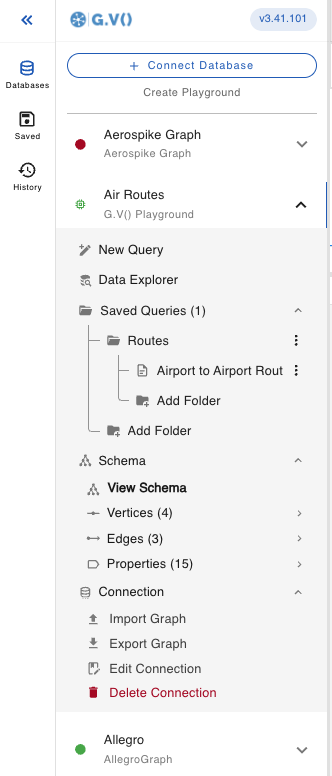
indicates that the server is either not available and reachable by gdotv, or that gdotv hasn't yet attempted to connect to it. You can attempt to connect to the server by clicking on the inactive indicator, opening a query editor or opening the Connection Menu Item. Failure to connect will be indicated by an error message displaying to the top right of the screen.
The following actions are available:
- New Query: This will open a Query Editor tab from which you can write and test out your queries. More information is available at Query Editor.
- Data Explorer: This will open a Data Explorer tab where you can query your database using manual filters. More information is available at Graph Data Explorer.
- View Graph Summary: (Amazon Neptune Engine 1.2.1.0 above and Aerospike Graph only): Displays Graph Summary information from your Graph Database based on their Graph Summary API.
- View Slow Query Logs: (Amazon Neptune Engine 1.2.1.0 above Only): A display of your Amazon Neptune database's slow query logs with one-click profile, explain and run controls to quickly troubleshoot your slow queries leveraging the Amazon Neptune Explain and Profile APIs. Read Amazon Neptune Slow Query Logs View for more details.
- View Audit Logs: (Amazon Neptune Only): A display of your Amazon Neptune database's Gremlin query audit logs with one-click profile, explain and run controls to quickly investigate and troubleshoot queries run on your database, leveraging the Amazon Neptune Explain and Profile APIs. Read Amazon Neptune Audit Logs View for more details.
- Saved Queries: A list view of your saved queries, which you can launch/delete from within the list. For more information on query management, see Save a Query.
- Schema: A list of available edges, vertices and their relevant properties are displayed as a tree view under this section and can be navigated by clicking on the various elements. You will also be able to manage stylesheets for your elements to modify the display within the graph results visualization. More information is available at Stylesheet Management.
- View Schema: Opens a Graph Schema tab from where you can visualize the structure of your graph database schema and explore your data model. See Graph Schema View for more details.
- Import Graph: This will import a graph file of your choice (.graphml, .xml, .json, etc) into your database. Note that this feature is only available for servers accessible over localhost at the moment. Importing of graph data for remote graph instances is not currently available.
- Export Graph: This will export your graph data to a graph file format of your choice (.graphml, .xml, .json, etc). Note that this feature is only available for servers accessible over localhost at the moment. Exporting of graph data for remote graph instances is not currently available.
- Edit Connection: This will open the Edit Connection screen described above.
- Delete Connection: This will prompt you to delete the connection. Note that deleting a connection will also deleted any saved queries under the connection.
Saved Queries
To view all of your saved queries in one place, click on near the top of the left sidebar. From here you can run, modify, arrange and delete any of your saved queries and folders. You can search by query name or filter by connection type. Folders can have any number of sub-folders which are displayed in a tree view.
Query History
To view previously run queries, click on near the top of the left sidebar. Queries can be filtered by connection and language. Queries can also be search filtered by their contents. Click on to open that query in a new tab, provided the original connection still exits. The menu allows you to load a query into the current editor, or open in another existing connection that supports the same language.
Data Model Management
Labeled Property Graphs
gdotv will attempt to load a "data model" (or "schema") for your graph database which consists of all known labels for edges and vertices as well as properties found on them. The data model specifically consists of the following:
- A list of vertex labels
- For each vertex label, a list of found properties and the type of the property (e.g. int, string, etc)
- A list of edges defined by their label, in vertex label and out vertex label
- For each edge, a list of found properties and the type of the property (e.g. int, string, etc)
Data model loading is an essential aspect of gdotv which influences many of the features of the application, such as the ability to suggest property keys, vertex/edge labels, etc whilst writing queries, the generation of stylesheets for the graph display, and many more.
RDF Triplestores
gdotv constructs a data model for your triple store by combining two sources. It loads the OWL/RDFS ontology statements stored on your triple store. It also discovers structure directly from your data. Both sources are merged into a single data model. See How gdotv Loads your Ontology for more details.
How gdotv Loads your Data Model
gdotv loads your data model automatically. You no longer need to pick a data model loading method.
The data model is built from the following sources:
- Database schema APIs: When your database exposes a schema API, gdotv reads the schema directly from it. For instance, Neo4j, Memgraph and Amazon Neptune Analytics offer Cypher procedures that document the structure of your graph data. This is the most efficient way to retrieve a schema and is used whenever available.
- Query results: As you run queries, gdotv inspects the returned data. New labels and properties found in your results are added to the data model automatically.
- Use Data Sampling to Fetch Schema: Optionally, gdotv can sample your database upfront to build a complete data model at connection time. See section below for additional details.
Your data models are stored per logical container, for example, a graph, dataset, repository, namespace, or the equivalent concept in the platform. If your connection exposes multiple datasets or repositories, each one keeps its own data model.
Proactive Schema Discovery Via Sampling Queries
When Use Data Sampling to Fetch Schema is enabled on your connection, gdotv periodically samples your database upfront to build its data model. The sampling uses queries that run when the connection is established. This gives you a complete representation of your graph database's schema upfront; however, it can take some time, especially for very large datasets.
This checkbox is only shown for databases that do not offer physical schema representations that gdotv can fetch immediately. If disabled, gdotv will instead build up the graph data schema as you run queries against your database.
How gdotv Loads your Ontology
For RDF triplestores, gdotv loads the data model and ontology using two complementary and tightly integrated mechanisms.
The first mechanism focuses on retrieval and consolidation of OWL, RDFS and SHACL metadata. All classes, equivalent classes, disjoint classes, and all types of inter-class properties are extracted from the dataset through precise and targeted queries. The semantic relationships among these elements are then inferred and unified into a coherent structure, which is visualized in the Data Model view. In this process, OWL, RDFS, and SHACL classes are represented as graph nodes within the data model, while OWL and RDFS properties are interpreted according to their domain and range. If both the domain and range are classes, the property is rendered as an edge between nodes. If the domain is a class and the range is a datatype, the property is represented as an attribute of the domain class in the data model.
In parallel with OWL/RDFS/SHACL metadata extraction, the system analyzes SPARQL query results to infer previously undiscovered classes, relationships, and literal properties directly from the data (see Gradual Data Model Construction). Even when a class has no explicit OWL or RDFS definition, gdotv can identify it if instances of that class exist in the dataset. It then discovers the relationships among those instances and lifts them to the schema level, representing them as edges between classes or as class attributes, as appropriate. This capability is particularly valuable for datasets that lack a formally designed ontology but nevertheless exhibit a high degree of structure and abstraction in the underlying data.
The resulting Data Model is therefore a unified representation that seamlessly integrates explicit ontology definitions with structures inferred from the underlying data. This combined approach ensures a complete, accurate, and practical view of the dataset’s conceptual and relational structure, even when the ontology is partial or implicit.
TIP
Here are some queries you can run on your graph to sample the data (relatively) quickly and efficiently when Proactive data-driven schema discovery is disabled. They help enrich the data model without a full upfront scan.
Discover all vertex labels and all of their properties (assuming all vertices have consistent properties)
g.V().limit(200000).group().by(label()).by(limit(1))g.E().limit(200000).group().by(label()).by(limit(1))Keeping your Data Model Up To Date
The data model keeps itself up to date automatically as you update your graph database from gdotv. The data model is loaded on initial connection to your database. It can also be pro-actively reloaded by clicking on from the Connection List sidebar, for instance if you modify your graph database structure from a separate Gremlin Console. You can also refresh it from the Graph Schema View.
WARNING
Proactive data-driven schema discovery relies on your graph database being capable of returning results to certain complex queries in reasonable amount of time (< 5-10 minutes) and may be unsuitable for very large graphs. Should gdotv be incapable of constructing the Data Model by sampling your database, it will instead fall back to Gradual Data Model Construction.
A Complex Data Model Loaded Displayed by gdotv: 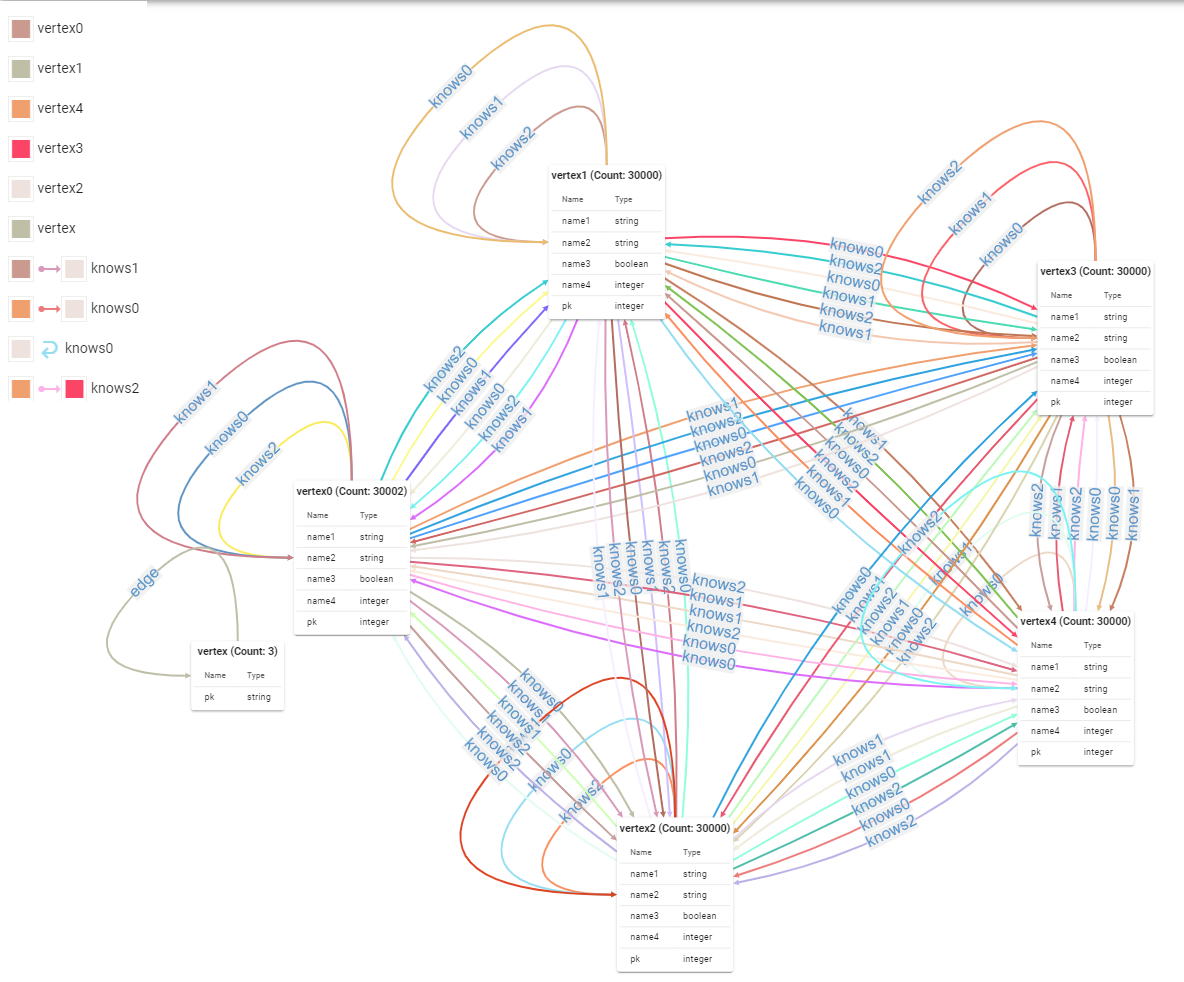
A Note on Data Model Loading for JanusGraph
If your JanusGraph instance is configured to enforce a default schema (via the schema.default setting), gdotv will rely on the Schema Management API to load the data model. It's a considerably faster and more accurate way to construct the data model and we encourage enforcing a default schema on your database where practical, particularly for larger graphs.
A Note on Data Model Loading for Azure Cosmos DB
The Azure Cosmos DB storage structure and Gremlin API function slightly differently. gdotv constructs the data model using the SQL API for performance reasons as it severely reduces the Read Units consumed in the process. This is particularly important for accounts configured with provisioned throughput as there may be limits to the complexity of queries your database will tolerate. The SQL API limits gdotv's ability edge/vertex properties and relies on a sampling model whereby we load a small set of elements and determine the available properties for a given element based on that sample. gdotv is configured with an element sample size of 1000 elements. Should your database have properties that are not found reliably and every vertex/edge as defined in the Data Model Management section, there is a chance that it may report inaccurately the properties available on your element.
TIP
The above only applies to the cloud version of Azure Cosmos DB, not the emulator.
Gradual Data Model Construction
When gdotv cannot read a schema from your database and Proactive data-driven schema discovery is disabled, the data model is constructed progressively. Vertices and edges fetched by the queries you run are inspected and added to the model. This is referred to as an incomplete data model.
If your data model is incomplete, the Graph Schema View will indicate it. The model may not fully reflect the entirety of the data available in your graph until more queries have been run or a proactive discovery has been performed.
Graph Schema View
Click View Schema on a connection to open the Graph Schema tab. It displays your data model as a graph. Each vertex label is shown with a table of its properties.
From this view you can do the following:
- Click on a vertex or edge to open a sideview with its details. The sideview has a Properties tab and a Relationships tab.
- Assign colors to vertex and edge labels from the sideview.
- Refresh the data model by clicking on . The tooltip shows when the data model was last refreshed.
- Select which container to inspect. If your connection exposes multiple containers (datasets, namespaces, or repositories), a selector appears in the toolbar. Each container has its own data model.