Using gdotv on Azure Marketplace (Virtual Machine)
Looking for the Kubernetes version?
This page describes the virtual machine deployment of gdotv Team Edition — a single VM running the full application stack, deployed in a few clicks. If you'd rather run gdotv on your own AKS cluster, see gdotv on Azure Marketplace (Kubernetes).
gdotv Team Edition is available as a virtual machine product on the Azure Marketplace.
It's a graph database client for teams, perfect for developers looking to start on a graph project or support an existing one. It is compatible with Azure Cosmos DB for Apache Gremlin, Amazon Neptune, Neo4j, Memgraph, FalkorDB, JanusGraph, Gremlin Server, Dgraph and many more graph databases.
We provide state of the art development tools with advanced autocomplete, syntax checking and graph visualization.
With gdotv you can:
- View your graph database's schema in 1 click
- Write and run Gremlin, Cypher, SPARQL, GQL and DQL queries against your database
- Visualize query results across a variety of formats such as graph visualization, JSON and tables
- Explore your data interactively with our no-code graph database browser
- Debug Gremlin queries step by step, and access profiling tools for Gremlin and Cypher
It is deployed as a single Azure virtual machine exposing the gdotv web interface over HTTPS (port 443), protected by username/password authentication.
Deploying a gdotv instance
To deploy gdotv from the Azure Marketplace, follow these steps:
- Navigate to the gdotv Team Edition listing on the Azure Marketplace
- Click Get It Now, then Create — you will land in the standard Azure virtual machine creation wizard
- On the Basics tab:
- Select or create a subscription and resource group
- Enter a virtual machine name and select a region — we recommend using the same region as your database(s)
- Under Size, select a VM size according to the sizing guide —
Standard_D4s_v5is the recommended default. A minimum of 8 GB of memory is required. - Under Administrator account, select SSH public key authentication and choose a username (e.g.
azureuser). You will occasionally need to SSH into the instance for operations such as version upgrades or TLS certificate deployment. - Under Inbound port rules, allow HTTPS (443) and SSH (22). We recommend restricting SSH access to your organization's IP addresses afterwards (via the network security group).
- On the Disks tab, keep the default OS disk — it is enough storage for any team size
- On the Networking tab, ensure a public IP is assigned (default)
- Click Review + create, then Create
The deployment is fully automatic. On first boot the instance generates its per-instance secrets and TLS certificate, then starts the application — gdotv is typically ready two to three minutes after the VM starts.
Keep the public IP static
The VM creation wizard's default public IP (Standard SKU) uses static assignment, which survives deallocations — keep that default. If your deployment uses a dynamically-assigned public IP, the instance re-detects its address at every boot and reconfigures itself (TLS certificate, authentication hostname) automatically — but the URL your team uses still changes, breaking bookmarks and DNS records, so prefer a static assignment.
Pricing
gdotv Team Edition is priced per vCPU-hour of VM runtime and billed through your Azure account. Charges only accrue while the instance is running — a stopped (deallocated) instance costs nothing in software fees. Azure's standard infrastructure charges (VM, disk, network) are billed separately by Microsoft.
Sizing Guide
The sizing guide below indicates how many users can use gdotv concurrently for a given VM size, and the corresponding software cost.
| VM size | vCPU / Memory | Concurrent users | Software cost per hour |
|---|---|---|---|
| Standard_D2s_v5 | 2 vCPU / 8 GB | Up to 5 users | $0.60 |
| Standard_D4s_v5 (recommended) | 4 vCPU / 16 GB | Up to 10 users | $1.20 |
| Standard_D8s_v5 | 8 vCPU / 32 GB | Up to 20 users | $2.40 |
| Standard_D16s_v5 | 16 vCPU / 64 GB | Over 20 users | $4.80 |
Regardless of the VM size, the default OS disk is enough to run the service smoothly.
Architecture
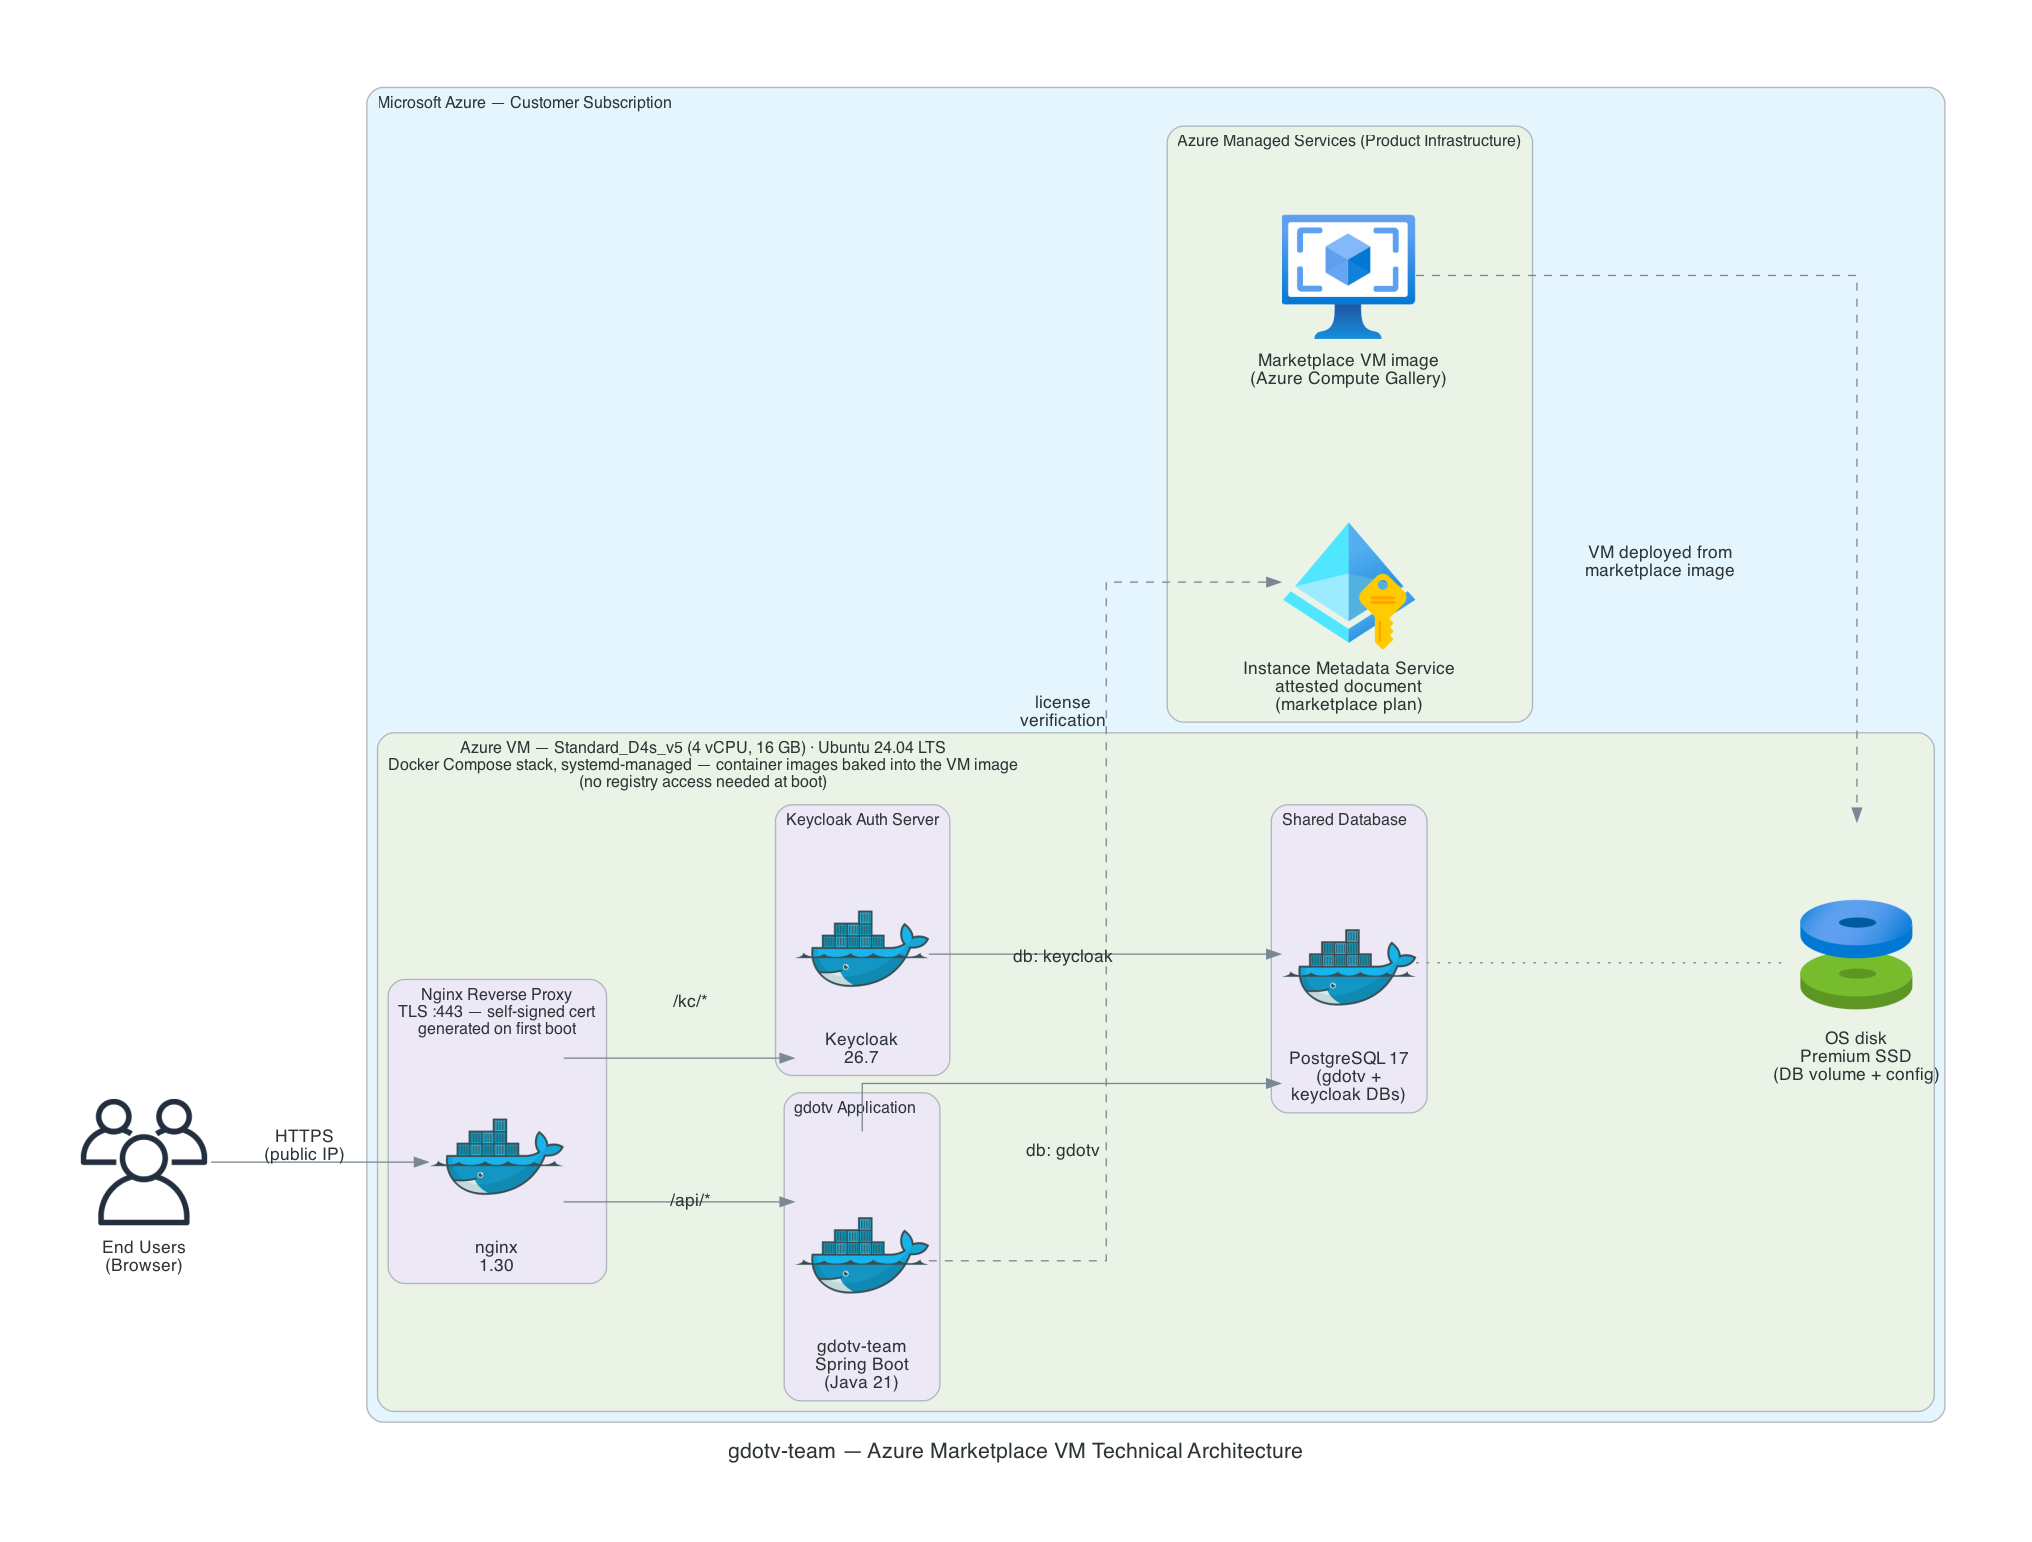
gdotv runs on an Ubuntu 24.04 LTS virtual machine with four Docker containers managed by Docker Compose and a systemd service (gdotv.service):
- gdotv-team: the gdotv web application
- gdotv-postgres: a PostgreSQL instance storing configuration data for gdotv and Keycloak (in separate databases with least-privilege roles)
- gdotv-keycloak: a Keycloak instance providing gdotv with user authentication and federation features, which can be configured further to enable Single Sign On authentication flows, or username/password/2FA login
- gdotv-nginx: an NGINX reverse proxy fronting the application over port 443, with TLS enabled by default
All container images are baked into the VM image — the instance needs no registry access to start, and no software is downloaded at boot. All secrets (database passwords, Keycloak credentials) are randomly generated per instance at first boot and stored in /opt/gdotv/.env, readable by root only.
Accessing gdotv on your web browser
Once deployed, gdotv is served at the virtual machine's public IP address: https://<public-ip>/. The public IP is shown on the VM's Overview page in the Azure portal.
TIP
If you see a "gdotv is starting up" page right after deployment, the application stack is still initializing — this resolves itself within two to three minutes of the VM starting. Refresh the page.
By default, gdotv uses a self-signed TLS certificate to enable traffic over HTTPS. Since the certificate is self-signed, your browser will warn that the connection may not be private. To proceed, click Advanced, then Proceed to {public-ip} (unsafe).
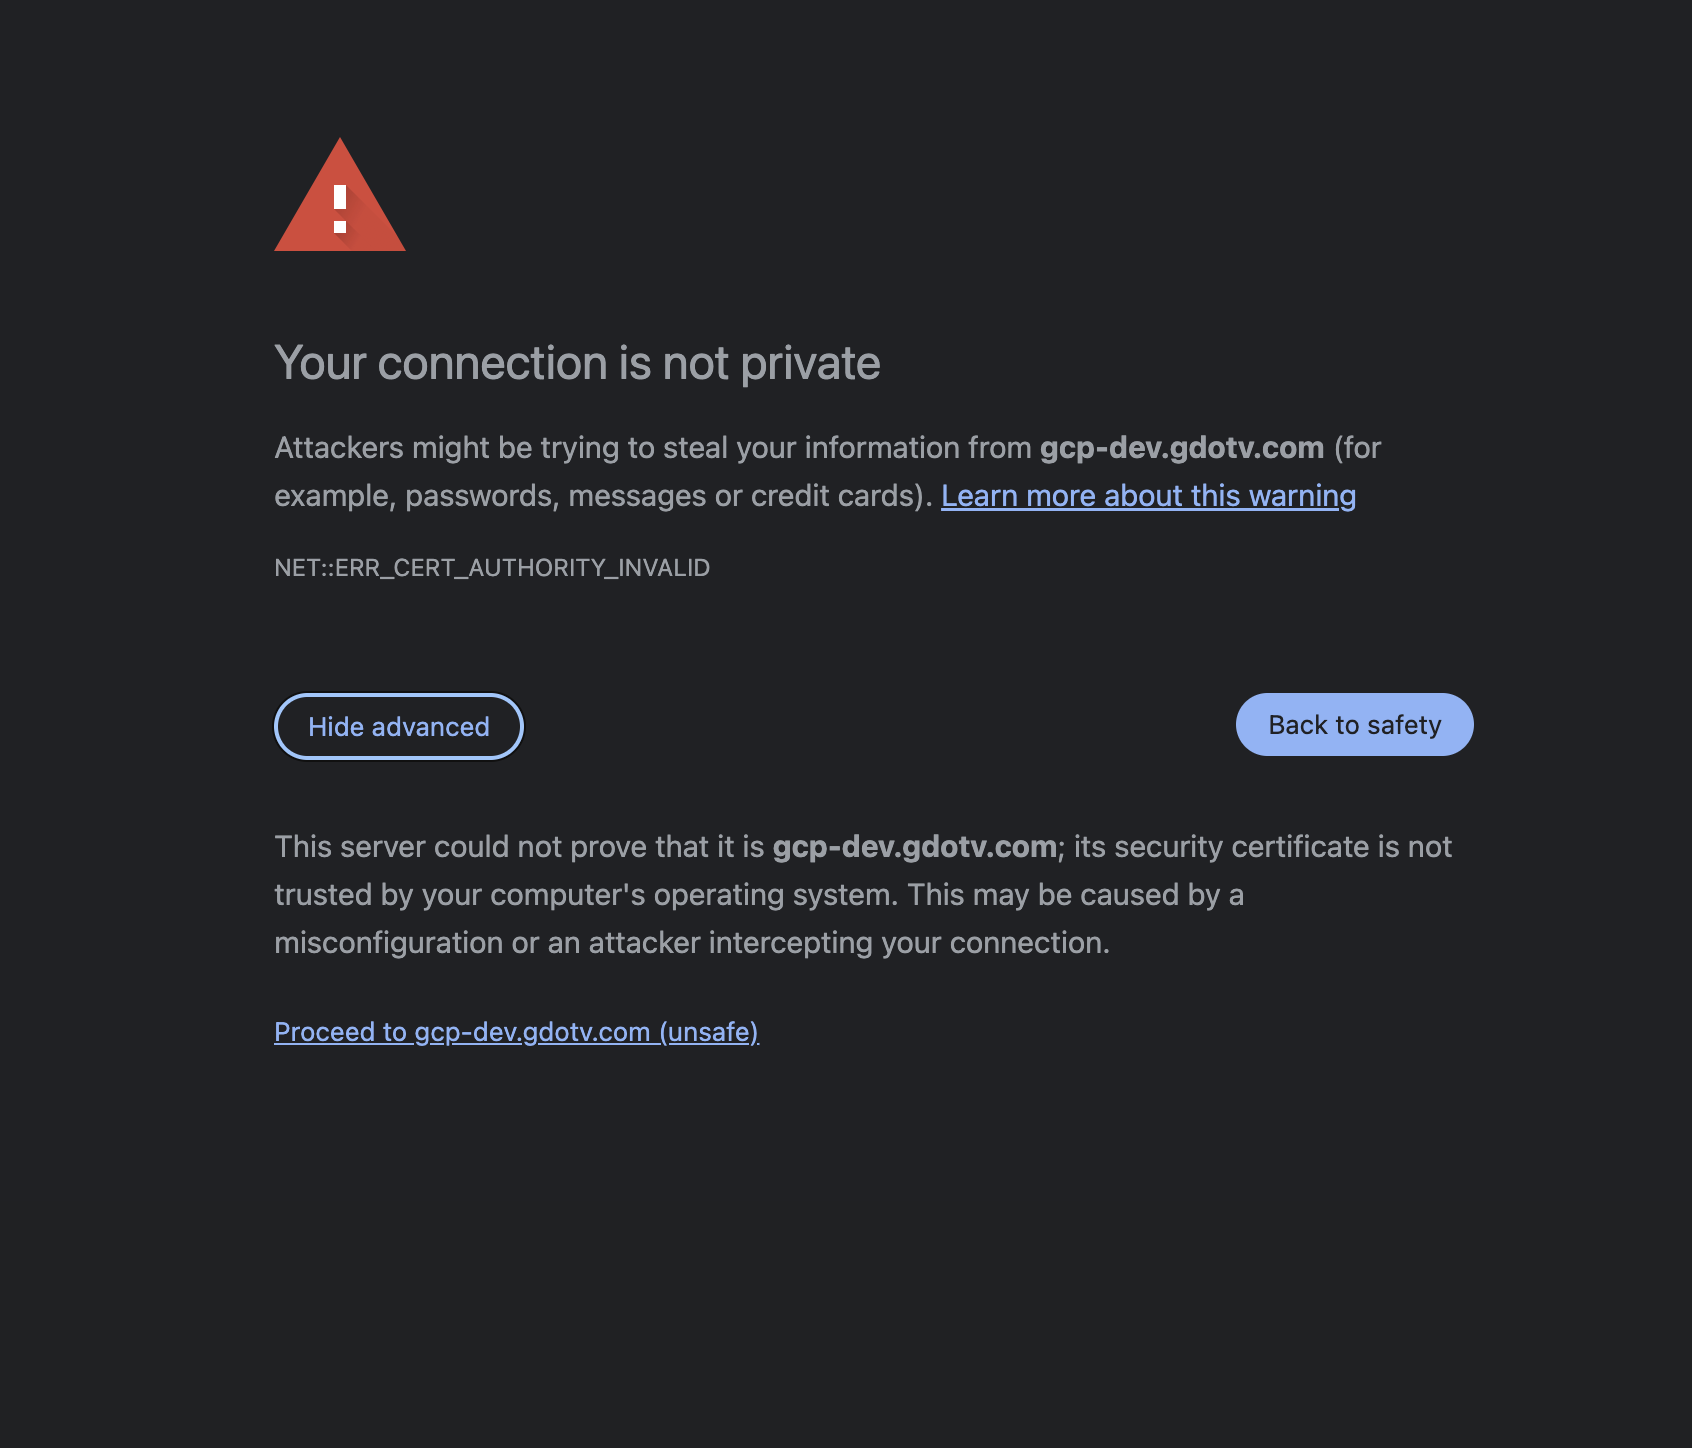
You can replace the self-signed certificate with your own trusted certificate, as described in Configuring a TLS certificate.
Authenticating to gdotv
gdotv uses username/password authentication via Keycloak to secure access to its interface. The initial credentials are:
- Username:
gdotv - Password: the VM's unique identifier (vmId) — a UUID such as
5c73f2a1-8c6e-4f3d-9a2b-1e64c7d90f12
You can retrieve it in three ways — no Azure CLI required for the first two:
- Azure portal, JSON View: open the virtual machine, click JSON View (top right of the Overview page), and copy the
properties.vmIdvalue. - Azure portal, boot log: on the virtual machine open Help → Boot diagnostics → Serial log and look for the
gdotv initial sign-inbanner — it shows the URL, username and initial password together. - Azure CLI:
az vm show --resource-group <resource-group> --name <vm-name> --query vmId --output tsvThe initial password is temporary: you will be required to set a new password at first login.
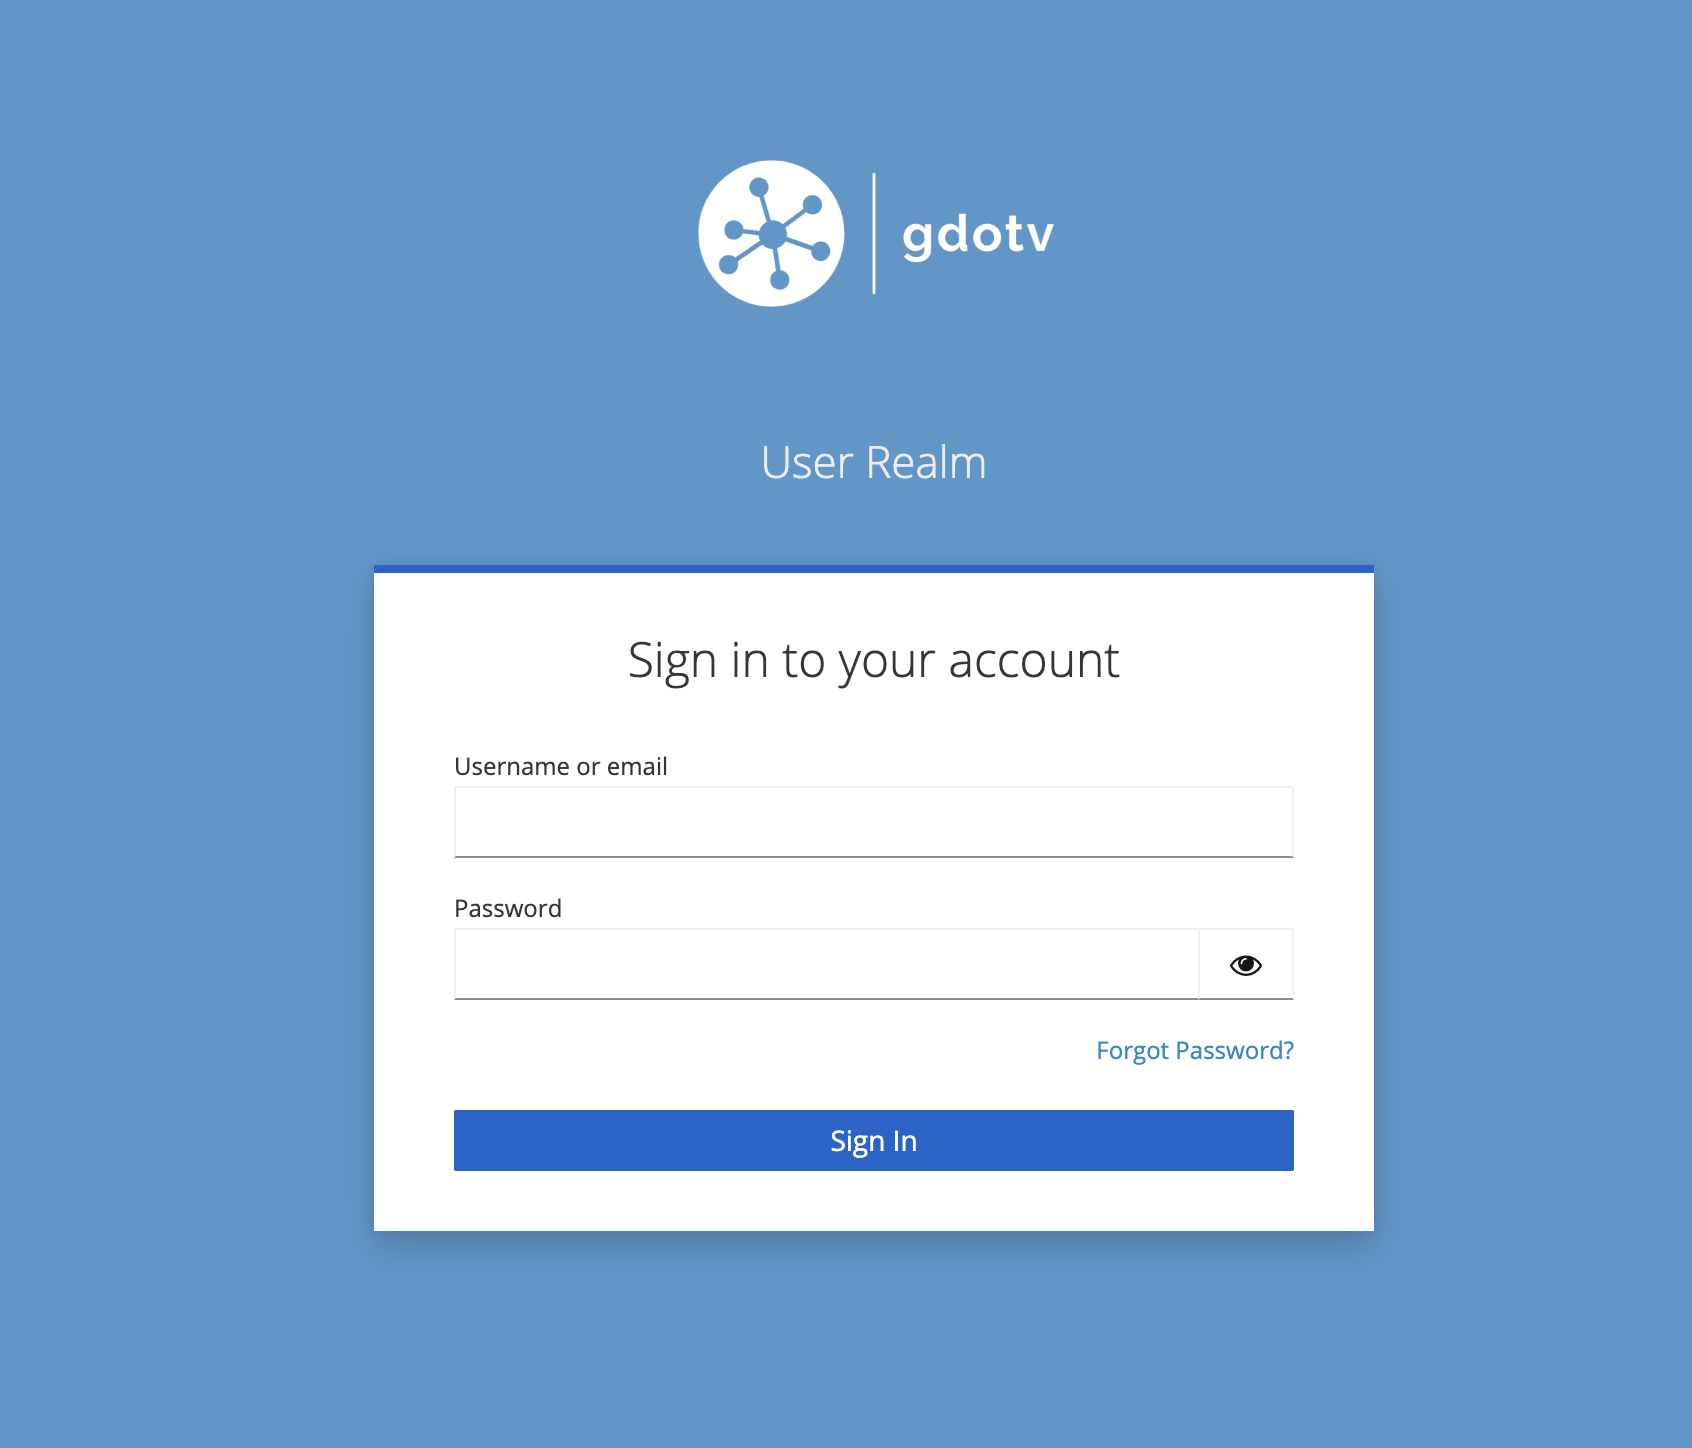
The initial gdotv user is an application administrator (it carries the gdotv-admin role).
Managing users
Keycloak is a powerful Identity & Access Management solution that provides user federation, management and authentication functionality. You can use it to add users for your team, and to configure advanced authentication flows such as Single Sign On via your identity provider (including Microsoft Entra ID). For more details, refer to the official Keycloak documentation.
To manage users, log in to the Keycloak admin console:
- Navigate to
https://<public-ip>/super-admin - Log in as user
admin, with the password stored asKEYCLOAK_ADMIN_PASSWORDin/opt/gdotv/.envon the instance (see Connecting to your instance via SSH):sudo grep KEYCLOAK_ADMIN_PASSWORD /opt/gdotv/.env - In the realm selector (top left), switch from master to the gdotv realm
- Under Users, create a user for each team member. Assign the
gdotv-adminrealm role to users who should administer gdotv itself.
TIP
https://<public-ip>/admin is a shortcut to the gdotv realm's own admin console. It accepts logins from gdotv realm users that hold the realm's admin role — you can grant that role to a trusted user to delegate user management without sharing the master Keycloak credentials.
We recommend changing the master admin password after initial setup (in the master realm: top-right menu → Manage account → Account security → Signing in).
Managed identity access to Azure databases
To connect gdotv to Azure services that authenticate with Microsoft Entra ID, give the VM a managed identity. gdotv's backend uses the Azure SDK's default credential chain: it obtains Entra tokens for the VM's managed identity from the instance metadata service automatically, so no secrets are ever stored on the instance.
- Enable a system-assigned managed identity on the VM (portal: VM → Security → Identity → System assigned → On, or):
az vm identity assign --resource-group <rg> --name <vm-name> - Grant the identity the roles your databases require — for example the relevant Azure Cosmos DB data-plane role on your Cosmos DB account.
No VM or application restart is needed — the identity is available to gdotv immediately, and tokens are fetched on demand.
Connecting to your gdotv instance via SSH
Day-to-day use of gdotv never requires SSH access — but administrative operations (TLS certificate deployment, version upgrades, custom hostname) do. To connect, use the SSH key pair and username configured at deployment:
ssh -i <path-to-private-key> <username>@<public-ip>Upon login, a welcome message summarizes the essential operations available on the instance.
Managing the gdotv service
The application stack is managed by systemd and starts automatically on boot. From an SSH session:
systemctl status gdotv          # service and container status
sudo systemctl stop gdotv       # stop the application
sudo systemctl start gdotv      # start the application
sudo systemctl restart gdotv    # restart (e.g. after configuration changes)
docker ps                       # individual container status
docker logs -f gdotv-team       # follow application logs
Configuring a TLS certificate
By default, gdotv serves its web interface with a self-signed certificate. To use your own trusted certificate:
- Assign a domain name owned by your organization to the VM's public IP address, and follow Configuring a custom hostname
- Copy your certificate and private key, in PEM format, over the following files on the instance:
- Certificate:
/opt/gdotv/certs/tls.crt - Private key:
/opt/gdotv/certs/tls.key
- Certificate:
- Restart the application:
sudo systemctl restart gdotv
Startup should complete within a minute.
TIP
Make sure the VM's public IP address uses the Static assignment (Public IP resource → Configuration) before creating the DNS record, so the address survives VM deallocations.
For production deployments, consider terminating public TLS on a managed service instead — see Reference architecture: custom domain with Application Gateway.
Configuring a custom hostname for gdotv
For security reasons, Keycloak strictly validates the hostname it is served under. If you assign a custom domain name to your gdotv instance, you must reflect it in the configuration:
- Create a DNS record pointing your domain at the VM's public IP, and wait for it to resolve
- SSH into the instance and edit
/opt/gdotv/.env(as root), setting:The hostname must not include a protocol or port, e.g.GDOTV_HOSTNAME=<your-domain>graph.example.com - Deploy a TLS certificate valid for that domain as described in Configuring a TLS certificate
- Restart the application:
sudo systemctl restart gdotv
Reference architecture: custom domain with Application Gateway
For production deployments, the recommended way to give gdotv a custom domain with a trusted certificate is to put an Azure Application Gateway (v2) in front of the VM:
- The Application Gateway terminates public TLS with a CA-issued certificate — supplied by your organization, typically stored in Azure Key Vault (which can also handle rotation)
- It forwards to the VM over HTTPS, trusting the appliance's self-signed certificate by uploading it as a trusted root certificate in the backend settings
Azure Front Door is not compatible with this appliance
Front Door rejects self-signed origin certificates outright and offers no way to upload a custom root — its "certificate subject name check" toggle only relaxes name matching, not chain trust. Connections fail with 502 OriginCertificateSelfSigned. Use Application Gateway, which supports self-signed backends.
Setup:
- On the VM first — pin the hostname and regenerate the appliance certificate for it (both required: Keycloak validates the public hostname, gdotv's internal call to Keycloak validates the certificate against it, and the Application Gateway will validate it too):Then copy
sudo sed -i "s|^GDOTV_HOSTNAME=.*|GDOTV_HOSTNAME=gdotv.example.com|" /opt/gdotv/.env sudo rm /opt/gdotv/certs/tls.crt /opt/gdotv/certs/tls.key sudo /opt/gdotv/scripts/firstboot.sh # regenerates the self-signed cert for the new hostname sudo systemctl restart gdotv/opt/gdotv/certs/tls.crtoff the VM — it becomes the gateway's backend trusted root. - Application Gateway (Standard_v2) in the VM's virtual network (its own subnet), with a static public IP:
- Listener: HTTPS 443 with your CA-issued certificate for the domain (PFX or Key Vault reference)
- Backend pool: the VM's private IP
- Backend settings: HTTPS 443, host name override = your domain, and the appliance certificate uploaded as a trusted root certificate; raise the request timeout (e.g. 180 s) for long-running queries
- Health probe: HTTPS, host = your domain, path
/api/application/is_ready(unauthenticated; returns 200 only once the application is fully up)
- DNS: create an A record pointing your domain at the Application Gateway's public IP
- Lock down: restrict the VM's network security group so port 443 is only reachable from the Application Gateway's subnet, and remove the public 443/80 rules
Note: if you later change the appliance certificate (e.g. re-running the hostname procedure), re-upload the new tls.crt as the trusted root — the gateway pins exactly that certificate.
Upgrading to a new version of gdotv
gdotv receives frequent updates with new features and improvements. We recommend keeping up to date with the latest version. There are two types of upgrades:
- Application updates: upgrading the gdotv software itself, in place
- VM image updates: new versions of the VM image published on the Marketplace, carrying operating system and dependency updates
Performing an application update
SSH into the instance and run:
sudo gdotv-upgrade <version>with the version number from the update announcement (e.g. 3.79.2). The upgrade tool:
- Backs up both databases to
/var/lib/gdotv/backups/— and aborts the upgrade if the backup fails - Pulls the new application image and applies it
- Waits for the application to report healthy
- Rolls back to the previous version automatically if the new version fails to start
Each upgrade is recorded in /var/lib/gdotv/deploy-history.log. Expected downtime is under two minutes.
Some releases need a VM image update
gdotv-upgrade replaces the gdotv application only. Some releases also change the components around it (the web proxy, Keycloak, the operating system), and those changes only reach you through a new VM image. The release notes say when this is the case. For example, the MCP server and live dashboard refresh introduced in 3.88.151 need the 3.88.151 VM image: a VM upgraded in place runs the new application without them. For those releases, perform a VM image update instead.
Performing a VM image update
To move to a newly published VM image version, you deploy a new VM and carry your data and your team's accounts across to it. Your graph databases are not touched.
What moves across
- Everything gdotv stores: connections, saved queries, dashboards, reports, query history, workspace settings and the audit trail
- Your team's login accounts, with their passwords and roles. Each account keeps its identity, so everyone finds their own work on the new VM.
What you set up again on the new VM
- The managed identity, if your VM uses one to reach Azure databases (see Managed identity access to Azure databases)
- A custom hostname and TLS certificate, if you configured them (see Configuring a TLS certificate and Configuring a custom hostname for gdotv)
- Any changes you made to Keycloak beyond adding users: identity providers (single sign-on, such as Microsoft Entra ID), groups, email (SMTP) settings, password policies. Recreate them before importing users (step 5), so that users linked to them import cleanly.
- AI assistants connected to gdotv's MCP server: reconnect them to the new VM
Changes your team makes on the old VM after step 2 are not carried over, so plan a short window in which nobody uses it.
Deploy the new VM from the latest version, at the same size or larger, on the same virtual network, following Deploying a gdotv instance. Wait for first boot to finish (about three minutes) and check that
https://<new-address>/loads.Export from the old VM. SSH into the old VM and run:
bashmkdir -p ~/gdotv-migration && chmod 777 ~/gdotv-migration cd /opt/gdotv sudo docker exec gdotv-postgres pg_dump -U postgres --no-owner --no-privileges gdotv | gzip > ~/gdotv-migration/gdotv-db.sql.gz sudo docker compose stop keycloak sudo docker compose run --rm --no-deps -v ~/gdotv-migration:/migration keycloak \ export --realm gdotv --users same_file --file /migration/gdotv-realm.json sudo docker compose start keycloakThe first command dumps gdotv's database. The others export the
gdotvKeycloak realm with its users, which takes Keycloak offline for a few seconds; the export ends withExport finished successfully. Thegdotv-migrationfolder now holdsgdotv-db.sql.gzandgdotv-realm.json. The realm file contains your users' password hashes: treat it as a secret.Copy the folder to the new VM, for example through your workstation:
bashscp -r -i <path-to-private-key> <username>@<old-vm-public-ip>:gdotv-migration . scp -r -i <path-to-private-key> gdotv-migration <username>@<new-vm-public-ip>:Import the data on the new VM:
bashsudo gdotv-migrate-import ~/gdotv-migration/gdotv-db.sql.gzGive the path in full, as above. The importer backs up the new VM's own (empty) database, replaces it with your data, restarts gdotv and waits for it to report healthy; if anything fails, it restores the previous state. On first start, gdotv upgrades the data from the old version automatically.
Import the users on the new VM:
bashcd /opt/gdotv jq '{ifResourceExists: "OVERWRITE", users: [.users[] | select(.serviceAccountClientId == null) | .realmRoles = ((.realmRoles // []) | map(if . == "admin" then "gdotv-realm-admin" else . end) | unique)]}' \ ~/gdotv-migration/gdotv-realm.json > ~/gdotv-migration/gdotv-users.json sudo docker exec -i -e KC_ADMIN_PASSWORD="$(sudo grep ^KEYCLOAK_ADMIN_PASSWORD= .env | cut -d= -f2-)" gdotv-keycloak bash -c ' kc=/opt/keycloak/bin/kcadm.sh cat > /tmp/gdotv-users.json $kc config credentials --server http://localhost:8080 --realm master --user admin --password "$KC_ADMIN_PASSWORD" $kc create partialImport -r gdotv -f /tmp/gdotv-users.json -o rm -f /tmp/gdotv-users.json for u in $($kc get roles/gdotv-admin/users -r gdotv -q max=10000 --fields username --format csv --noquotes); do $kc add-roles -r gdotv --uusername "$u" --rolename gdotv-realm-admin && echo "gdotv-realm-admin: $u" done' < ~/gdotv-migration/gdotv-users.jsonThe import reports how many users it added and overwrote. Your old
gdotvaccount replaces the new VM's, so it signs in with its existing password, not the new VM's ID. The last lines give every gdotv administrator thegdotv-realm-adminrole, which lets them manage users from gdotv's user menu.Check the new VM: sign in with your usual account, and check that your connections, saved queries and dashboards are there.
Switch your team over. Move your public IP address or DNS record to the new VM, or share its new address. If the address changes, see The VM's public IP address changed.
Clean up. Delete the
gdotv-migrationfolder from both VMs and your workstation (sudo rm -rf ~/gdotv-migration). Keep the old VM stopped for a few days as a fallback, then delete it.
Backup and restore
gdotv only stores connection configurations, user workspace settings, saved queries and dashboards — your graph databases themselves are never stored on the instance. We nonetheless recommend regular backups:
- Disk snapshots (simplest): use Azure Backup or scheduled managed disk snapshots for the VM's OS disk. To restore, create a new VM from the restore point or snapshot.
- Database dumps (portable): the pre-upgrade dumps in
/var/lib/gdotv/backups/are full backups (pg_dumpall); you can produce one at any time with:and copy it off the instance (e.g. to an Azure Storage account).sudo docker exec gdotv-postgres pg_dumpall -U postgres | gzip > gdotv-backup-$(date +%F).sql.gz
Troubleshooting
The application is not reachable over port 443
- Verify the VM is running and
systemctl status gdotvreports active - Check the network security group attached to the VM's network interface or subnet allows inbound TCP 443 from your address
- Verify a public IP is associated with the VM (organizations sometimes restrict public IPs — in that case, access gdotv through your private network / VPN using the VM's private IP)
The application shows "gdotv is starting up"
The stack is initializing — normal for two to three minutes after the VM starts or restarts. If it persists beyond five minutes, SSH in and check systemctl status gdotv and docker logs gdotv-team.
The VM's public IP address changed
If the VM was using a dynamically-assigned public IP and was deallocated and restarted, it received a new address. The instance reconfigures itself for the new address automatically at startup — simply access gdotv at the new IP shown on the VM's Overview page, and switch the public IP resource to Static assignment (Public IP resource → Configuration) so the address stops changing. Automatic re-alignment deliberately never touches a custom hostname you configured.
If the application is still configured for the old address (for example on an instance created before this behavior shipped), re-align manually — SSH in and run:
sudo sed -i "s|^GDOTV_HOSTNAME=.*|GDOTV_HOSTNAME=<new-public-ip>|" /opt/gdotv/.env
sudo rm /opt/gdotv/certs/tls.crt /opt/gdotv/certs/tls.key
sudo /opt/gdotv/scripts/firstboot.sh    # regenerates the TLS certificate for the new address
sudo systemctl restart gdotv
The application is stating that license verification failed
The instance verifies it is running from an Azure Marketplace image. If verification fails, the application displays instructions describing the issue. This can happen if the VM was created by copying the disk to a non-Marketplace image rather than deploying through the Marketplace. Contact us at support@gdotv.com if you believe verification is failing incorrectly.
Additional support
For any support queries, email us at support@gdotv.com. Support is free and we answer all queries within one business day.