
Amazon Neptune 101: Creating & Connecting to Your First Cluster [Developer Walkthrough]
![Amazon Neptune 101: Creating & Connecting to Your First Cluster [Developer Walkthrough]](https://gdotv.com/wp-content/uploads/2025/06/amazon-neptune-graph-database-developer-guide.png "Amazon Neptune 101: Creating & Connecting to Your First Cluster [Developer Walkthrough]")
Neptune is Amazon’s purpose-built graph database service. In this developer guide, we’ll show you how you can connect to an Amazon Neptune database locally, which will enable you to use G.V() — and any other local applications — with your database. We’ll refer to your Amazon Neptune database as a cluster moving forward.
First, we’ll walk you through the basics of creating a Neptune cluster from scratch in Part 1. This is just a simple test cluster that we’ll use in Part 2 to demonstrate how we can connect to our Neptune cluster using an EC2 instance and an ssh tunnel. Finally, in Part 3 we’ll show you how to query and visualize your Neptune graph data using G.V().
Part 1: Setting Up a Neptune Cluster
To start, let’s make a simple Amazon Neptune cluster. If this is your first time, see the step-by-step walkthrough below. Otherwise go ahead and skip straight to Part 2 for SSH tunneling instructions.
Step 1.1: Opening the Neptune Console
When you first sign into Amazon Web Services, you will be redirected to the AWS Console. You can find the Neptune service by opening the left-hand panel and selecting “All services.”
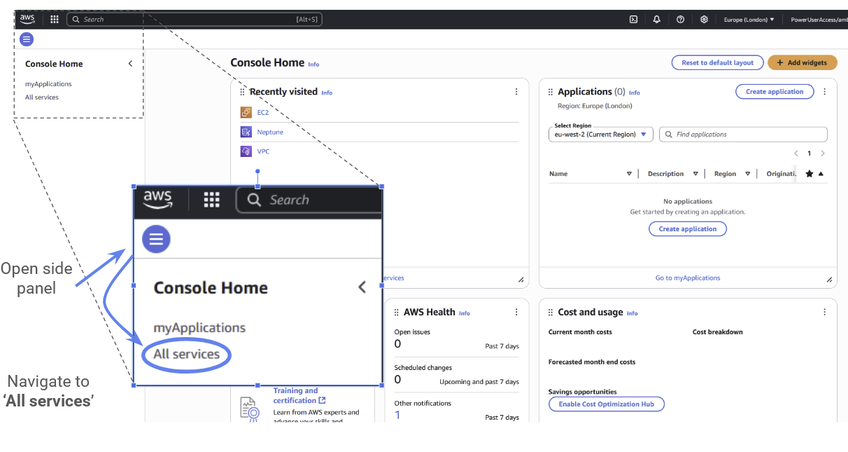
Figure 1: How to find a list of all available Amazon Web Services.
As you can see, AWS has a large number of services! We’ll only use three of them in this tutorial. First, let’s go to Neptune directly, which can be found in the “Database” category.
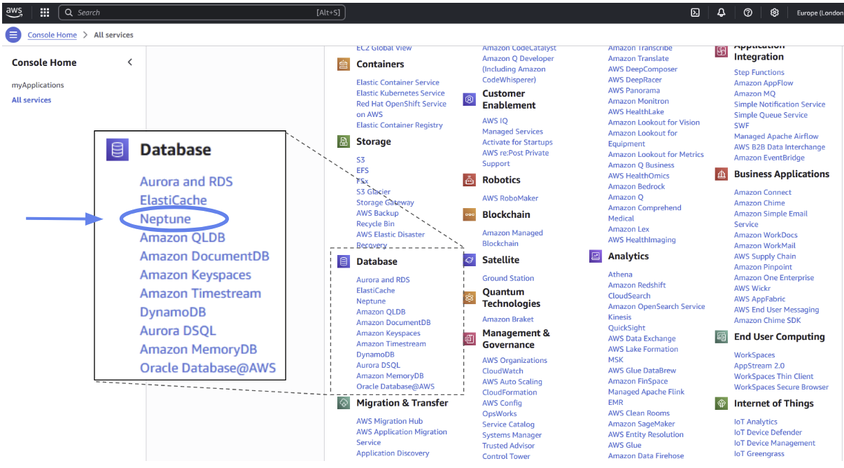
Figure 2: The location of Amazon Neptune within Amazon Web Services.
You’ll be prompted with an invitation to Launch Amazon Neptune. Since that’s exactly what we want to do, let’s start with that.

Figure 3: Click the “Launch Amazon Neptune” button.
Step 1.2: Setting Up a Neptune Cluster
Now we’re greeted by the database creation screen. Before we do anything, let’s make sure the region we want to use is correctly selected in the top right corner.
Gdotv is based in the United Kingdom, so we’ll go with Europe (London).
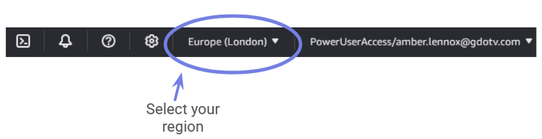
Figure 4: Select the region for your Neptune cluster.
Now we can select our database options.
Select “Provisioned” under type. For the engine version, you can select the most recent Neptune Engine.
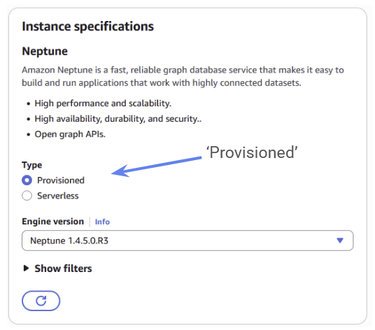
Figure 5: Make sure to choose Provisioned for your instance specifications.
For our Template, we’ll just use a simple “Development and testing” environment
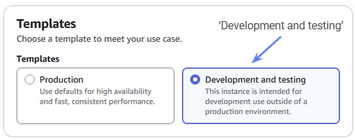
Figure 6: Choose “Development and testing” for your template type.
We need to give our cluster a name. This can be anything you like. We chose gdotv-neptune-test.
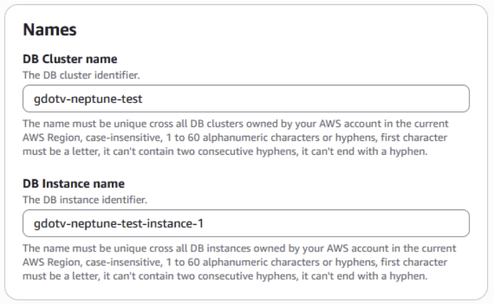
Figure 7: Name your Amazon Neptune instance.
We’ll choose standard storage configuration, since we’re not doing anything too crazy right now.
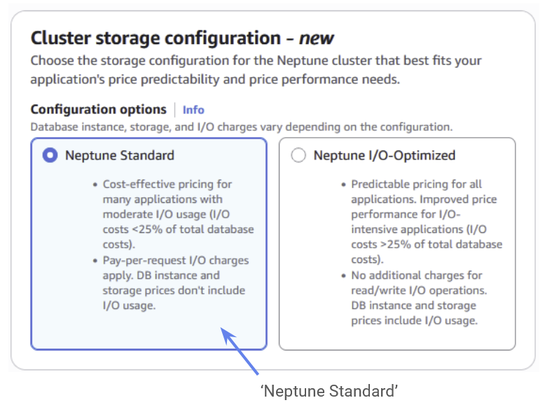
Figure 8: Select your cluster storage configuration – just set it to Neptune Standard.
You can ignore Instance Options, Availability and Durability for now. Just leave these on the default settings.
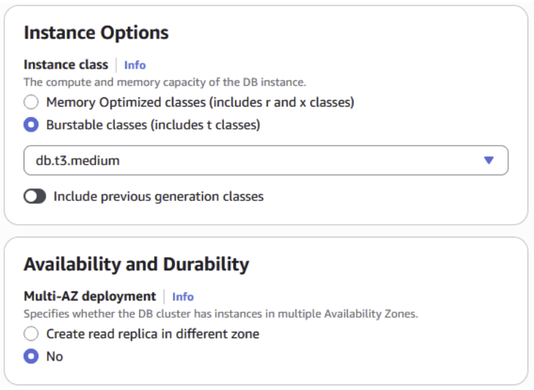
Figure 9: Just leave these settings on the default values.
You’ll be asked which Virtual Private Cloud you want to use. This is the private network in which your Neptune cluster will be hosted. We’ll discuss this in more detail and discuss its importance in Part 2: Accessing Your Neptune Cluster.
For now, select whatever your standard VPC is, which might be marked with “Default.”
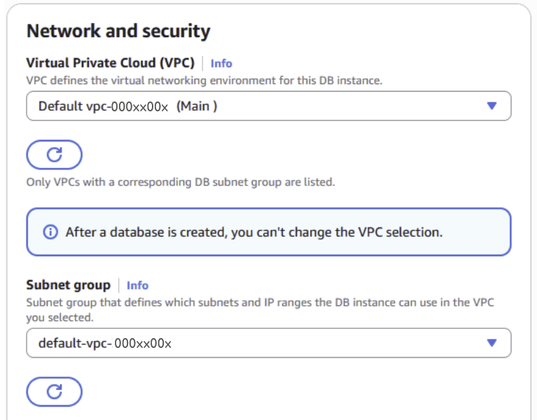
Figure 10: Select the VPC group that will hold your Amazon Neptune cluster.
We now have to select our VPC security group. Again, we’ll discover its importance in Part 2. It’s basically a list of rules for how different services within your VPC can interact within each other.
For now click “Create new” and give your new security group a name. We’ve chosen gdotv-neptune-security.
This new security group that you’ve created will be an empty group with no rules. Since we’re just creating our Neptune cluster for now, we don’t need to interact with anything yet, so this is fine at the moment. We’ll add rules to our group in Part 2.
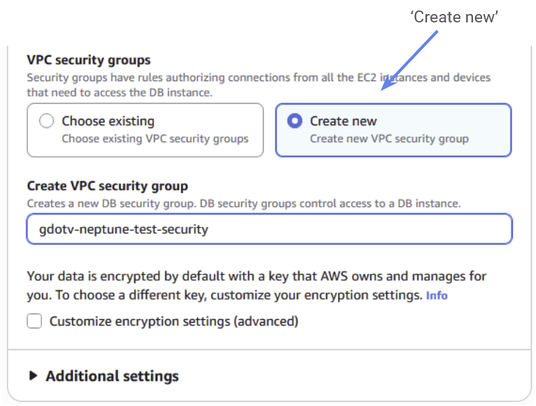
Figure 11: You should create a new VPC security group and give it a name.
You can ignore the tags option.
When you get to Notebook configuration, turn “create notebook” off. It’s an extra service Neptune offers, but we won’t be using it.
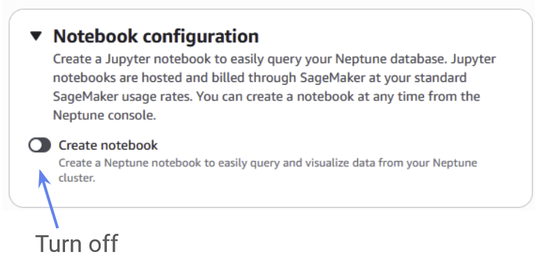
Figure 12: Make sure to turn off create notebook.
You can ignore the additional settings and proceed directly to Create database.
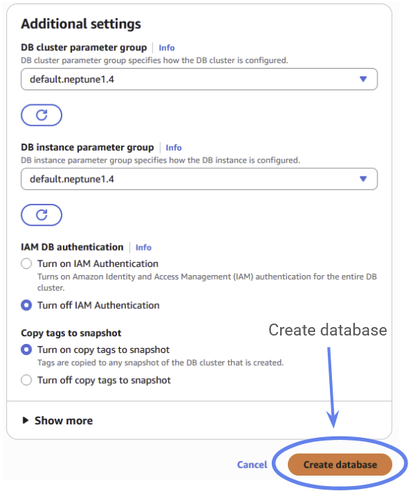
Figure 13: Make sure to turn off create notebook.
If the process is successful, you should be taken to the Neptune cluster console where you can see your new Neptune cluster. Note that it may take some time, (about 1-2 minutes) to finish creating the database and produce the confirmation message.
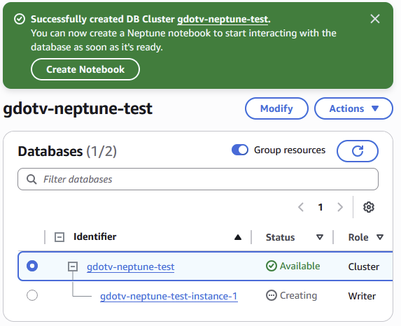
Figure 14: If everything worked properly, you should get a confirmation message.
Congratulations! You’ve just created your Neptune cluster.
Part 2: Accessing Your Neptune Cluster
Step 2.1: Understanding the Problem
Although we only want to interact with a single Amazon Web Service — that is, Amazon Neptune — we actually can’t do that directly because Neptune clusters are private by default. To connect to the Neptune cluster from our device, we actually need to use three (3!) different Amazon Web Services: Amazon Neptune, Amazon VPC and Amazon EC2.
Let’s clear things up by discussing each service, and why we need it.
Whenever you make a Neptune cluster, it’s automatically loaded into another kind of Amazon Web Service — a Virtual Private Cloud or VPC. A VPC is a section of the AWS cloud infrastructure that has been made private for use by you or your organization. Here, Amazon will host your services on the cloud for you, but with the additional privacy of a personal network. You might remember that you had to select a VPC when configuring your Neptune cluster in Step 1.2.
Because the VPC is private, it is by default not publicly accessible. That means that your VPC (and everything inside it) is invisible to the public internet and any attempt to access it directly will be denied. That’s great for security and privacy, but tricky if you want to quickly access your Neptune cluster from your development environment.
At this stage, this also means our Neptune cluster is also inaccessible to us. So how do we get in?
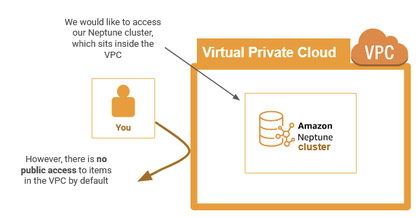
Figure 15: This diagram illustrates the way your Amazon Neptune cluster is contained within a VPC that is not publicly accessible by default. That means any attempt to access the VPC will be rejected.
This is where we introduce the third Amazon Web Service — EC2, or Elastic Compute Cloud. EC2 is a virtual machine that, just like your Neptune cluster, also sits inside your VPC.
It’s a separate service with all kinds of applications of its own, but today we’ll use it for a special trick. Unlike a Neptune cluster, an EC2 machine (or “instance”) has a public endpoint. This means that there is a part of the EC2 that sits on the “edge” of the VPC.
If you set up appropriate permissions correctly, you can even go through the EC2 to talk to services inside the VPC, such as Amazon Neptune. In this way, the EC2 functions like a door.
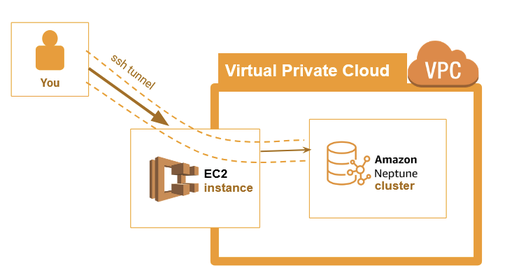
Figure 16: An EC2 instance also exists in the VPC, but unlike the Amazon Neptune cluster, this EC2 instance has a public endpoint. If we have the proper authentication, we can use an ssh tunnel to go through the EC2 and into the Neptune cluster.
Up next, we’ll walk through setting up an EC2 instance in the same VPC as your Neptune cluster in order to connect locally. We’ll do this final step via an ssh tunnel, which we’ll explain later.
Step 2.2: Setting Up an EC2 Instance
First, let’s set up our EC2 instance. EC2 is another Amazon Web Service that can once again be found under the “All Services” tab that we accessed in Step 1.1. You can find it under the “Compute” category.
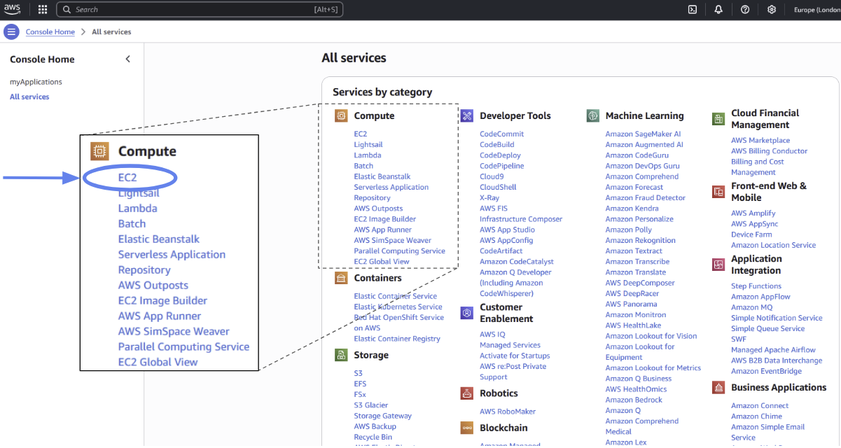
Figure 17: The location of Amazon EC2 within Amazon Web Services.
Once again, we go straight into launching our instance.
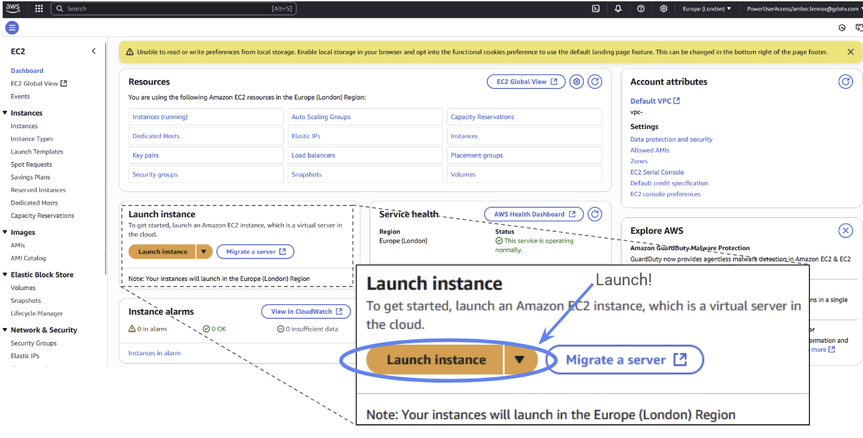
Figure 18: Click “Launch instance” to activate your EC2 instance.
Just like before, check that your region is correct and that it matches the region you previously picked for your Neptune cluster. In this example, we’ll choose Europe (London).
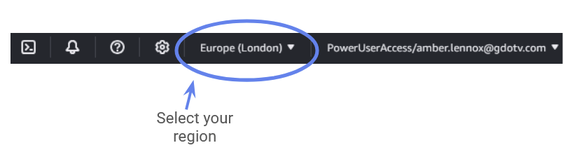
Figure 19: Choose the region for your EC2 instance. Make sure it matches the region you chose while creating your Amazon Neptune cluster.
Now we need to configure the virtual machine.
The first step is to give our EC2 instance a name. We’ll call it gdotv-ec2-test.
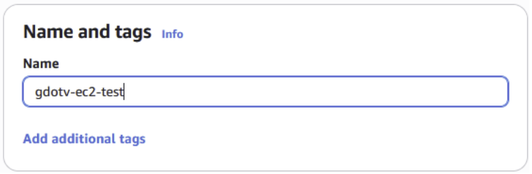
Figure 20: Name your new EC2 instance.
We’ll use Amazon Linux as our Operating System (OS) with a 64-bit (x86) Architecture.
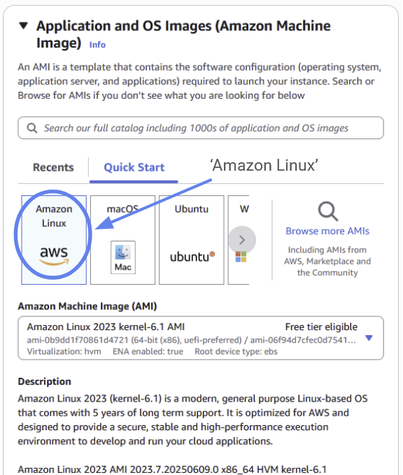
Figure 21: Choose “Amazon Linux” as the operating system for your new EC2 instance.
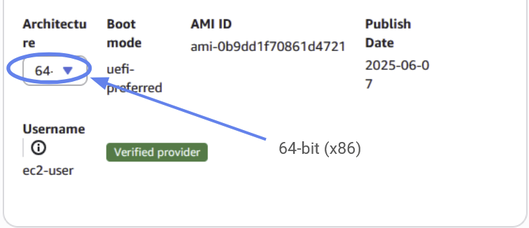
Figure 22: Give it 64-bit(x86) architecture.
Next we have to choose our instance type. We won’t make any high demands of our EC2 instances, so we can choose t2.micro with modest specifications — it’s also free-tier eligible.
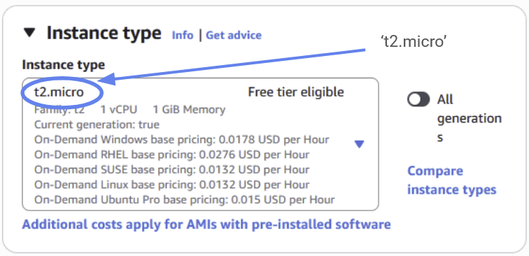
Figure 23: Set your instance type to “t2.micro”.
The next step is to select a key pair. This step is very important: we won’t be able to log in without it! We’ll create a new key pair for now.
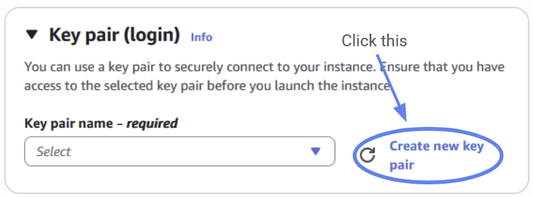
Figure 24: You should create a new key pair.
Give a name to your key pair. Your key will be unique to you, so you can give it a unique identifier, like your name.
You can set the key pair type to “RSA” and the format to ‘.pem’
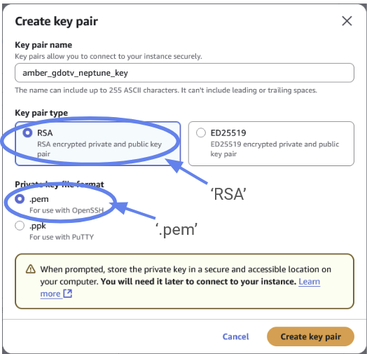
Figure 25: Set your key pair type to “RSA” and your file format to “.pem”
When you click Create key pair, a .pem file will appear in your downloads.
Keep this file in a secure and accessible place on your computer. Put it somewhere safe and keep a note of the file location.
What have we just done? — If you’re not familiar with SSH, you’ve just downloaded the EC2 instance’s SSH key. It’s a secure access credential you will use later (in Step 2.5) to log into your EC2 instance via SSH.
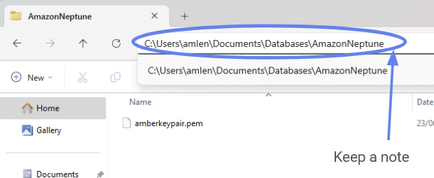
Figure 26: Your private key will be downloaded to somewhere on your computer. Make a note of the location, we will use it later.
Now we just have to configure a few final settings on our EC2 instance. Let’s create a new security group and allow SSH traffic from anywhere, for simplicity. You can optionally restrict it to a specific set of IP addresses but leaving it unrestricted at this stage is fine. We’ll talk more about what a security group is in the next section.
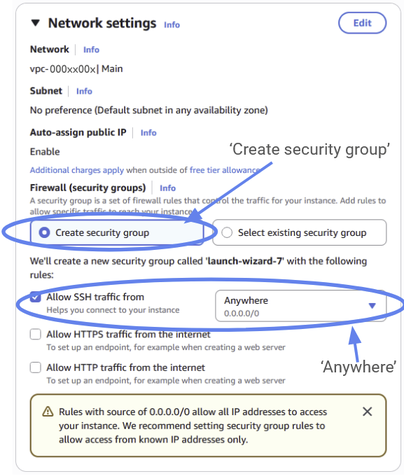
Figure 27: Under firewalls, you should select to “Create security group” and allow ssh traffic from anywhere.
The last step is to configure storage. Let’s select 8GB.
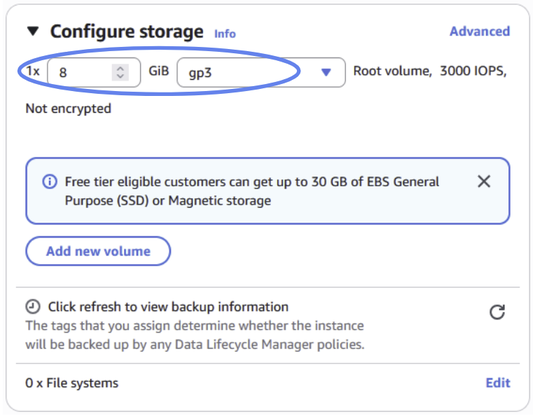
Figure 28: Configure your storage to 8GB.
Ignore the advanced settings and move straight to Launch instance.
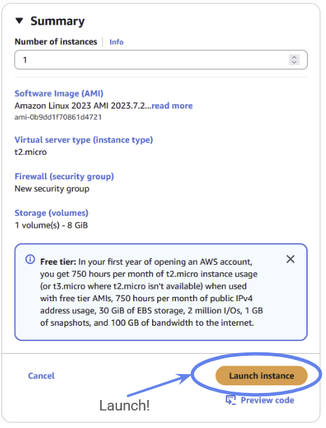
Figure 29: You are now ready to launch your EC2 instance.
You should be taken to your EC2 Instances console, where you can now see your new EC2 instance running!
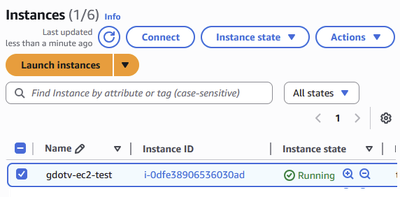
Figure 30: Your new EC2 instance should be visible from your Amazon EC2 console.
Congratulations! You’ve launched your EC2 instance.
Step 2.3: Reviewing Your Setup
By now, we’ve ensured that all three Amazon Web Services you need are up and running.
There are a couple more things we need to do, but it’s worth taking a moment to review what we’ve done so far. The AWS console can be tricky to navigate if you’re not very familiar with it, and we’ll need to make sure we know how to find the information we need.
Your Neptune clusters, EC2 instances, and VPC management console can be found under “All services” on the AWS console. They’re located under Database, Compute, and Networking & Content Delivery.
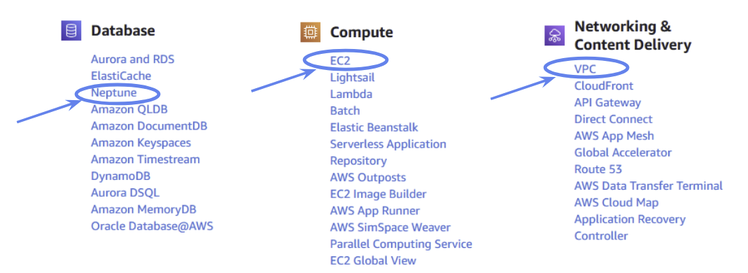
Figure 31: A summary of the three basic Amazon Web Services we have used so far – Amazon Neptune, Amazon EC2 and Amazon VPC.
You might also find them under recently visited on the console homepage.
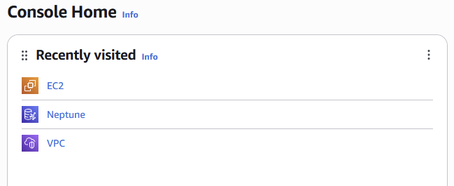
Figure 32: You can access various Amazon Web Services from the ‘recent’ section on the console home page.
Take a few moments to navigate between the different pages, familiarizing yourself with the different dashboards. You may not have opened the VPC console yet, so you should look at that too.
- From the Neptune dashboard, you can find your Neptune clusters by navigating to Databases > Clusters.
- From the EC2 dashboard, you can find your EC2 instance by navigating to Instances > Instances.
- From the VPC dashboard, you can find your VPCs under Virtual private cloud > Your VPCs.
If there is more than one Neptune cluster, EC2 instance, or VPC on the list, make sure that you can identify the ones you’ve just made. Once you’re ready, move onto the next step.
Step 2.4: Configuring Your Security Groups
Although we have all our services set up, we’re not yet ready to access our Neptune cluster. We still have to modify a couple of settings to make sure we have the right permissions.
One thing we need to do is configure security groups. A “security group” is essentially a list of rules that decide how traffic is allowed to move around our VPC. This is a good thing: without security groups, anyone who connects to any of our EC2 instances would have free access to everything inside the VPC, and we probably don’t want that. But it does mean we have to manually give ourselves permission to access the parts we need.
Just like how different states within a country may have different laws, different parts of our VPC might have different rules. It’s common for a VPC to have many different security groups. Indeed, you might remember that we have already created two new security groups — one for our Neptune cluster and one for our EC2 instance in Step 1.2 and Step 2.2 respectively.
Helpful Reminder: You can see all security groups in your VPC from the VPC dashboard under Security > Security Groups. Note that if you or your organization has already been using Amazon Web Services that this list might include a large number of extra, irrelevant security groups that we don’t need. Because it’s easy to get lost in a large number of security groups, we won’t bother with this portal too much for the moment.
Right now, all we care about are the new EC2 and Neptune security groups we just made. These control traffic in and out of each service, and we’ll need to be able to move through both of them to access our new Neptune cluster.
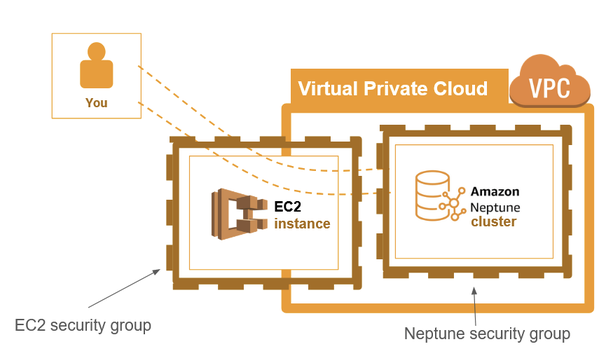
Figure 33: A more detailed diagram illustrating the structure of our VPC. The different Amazon Web Services are managed by security groups, which control the flow of traffic in and out of each service.
Step 2.4.1: Configuring Your EC2 Instance Security Group
Navigate to the EC2 instance from the EC2 Dashboard > Instances > Instances and click on the instance id.
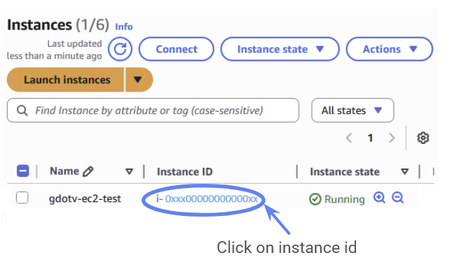
Figure 34: We want to examine our EC2 instance, so you should click on the instance id.
On the instance summary page, make a note of the public DNS. This is the location of the public endpoint we mentioned earlier and the whole reason we made the EC2 instance. We’ll need it to connect to Neptune via the EC2 instance later.
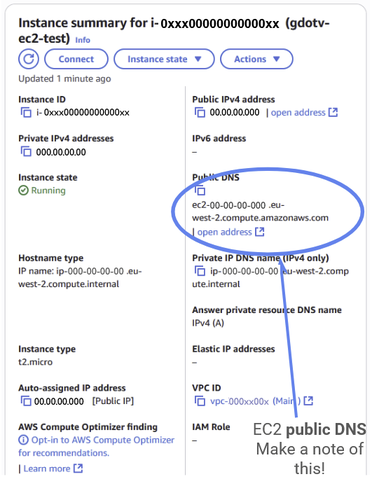
Figure 35: Once on the instance page, make a note of the public DNS for the EC2 public endpoint. We will use it later.
You can locate the EC2 security group at the bottom, under the security tab. Make a note of the security group id — we’ll use it in the next step.
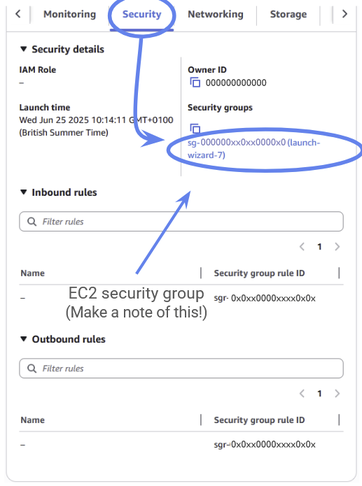
Figure 36: Nagivate down to the security tab and make a note of the security group ID. Then click on it.
Now click on the security group id. From the security group console, you’ll see this security group’s rules listed under Inbound rules and Outbound rules. (You’ve seen these on the previous page, but you can only edit them from within the security group console).
We want to allow incoming traffic via SSH, and all outgoing traffic. If you followed the instructions in Step 2.2, this security group should already be set up correctly, and we don’t need to make any changes.
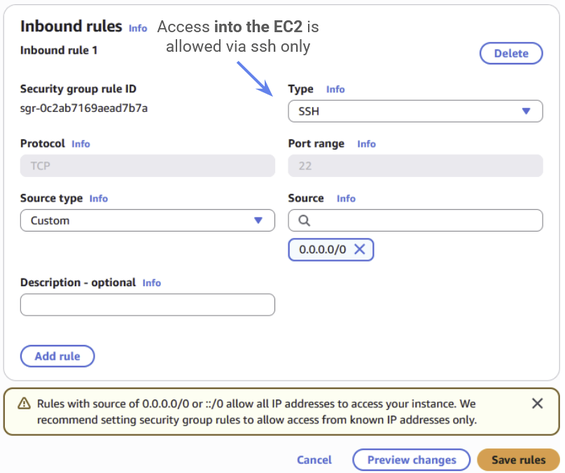
Figure 37: The inbound rules for the EC2 security group. These should already be set up as they are in the diagram, with incoming traffic allowed via ssh only.
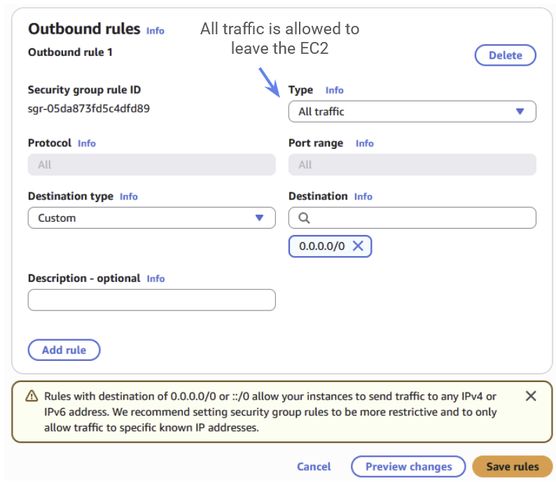
Figure 38: The outbound rules for the EC2 security group. These should already be set up as they are in the diagram, with all outgoing traffic allowed.
Step 2.4.2: Configuring Your Neptune Cluster Security Group
We can access the Neptune cluster security group in a similar way. Navigate to your cluster instance from the Neptune Dashboard > Databases > Clusters and click on the cluster instance:
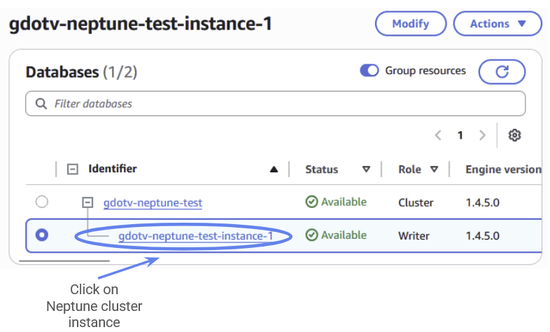
Figure 39: Navigate to your Neptune clusters console and click on your cluster instance.
You should see the security group listed under the Connectivity and Security tab.
While you’re here, you should note down the Neptune cluster endpoint. This is how we’ll find the location of the cluster later.
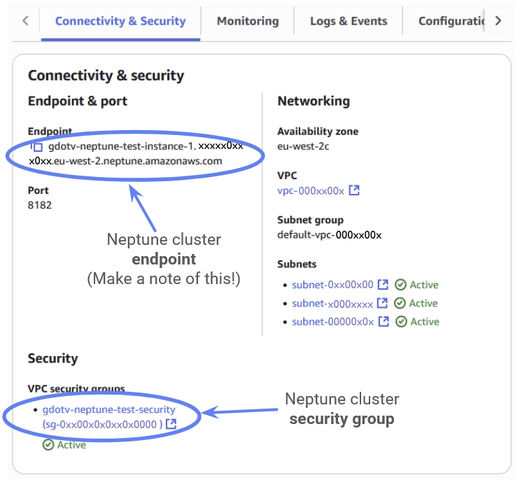
Figure 40: Navigate to the “Connectivity and Security” tab and make a note of your Neptune endpoint. Then click on the Neptune security group.
Now click on the security group.
Note: When you click on the Neptune security group it will actually open in the EC2 cluster dashboard. This is because security groups are technically an EC2 feature that other AWS might use. If you have multiple tabs open it can be easy to get confused and lose track of which security group you are looking at. You can check that this really is an Amazon Neptune security group by checking under Description, where it should say “Amazon Neptune Created.”
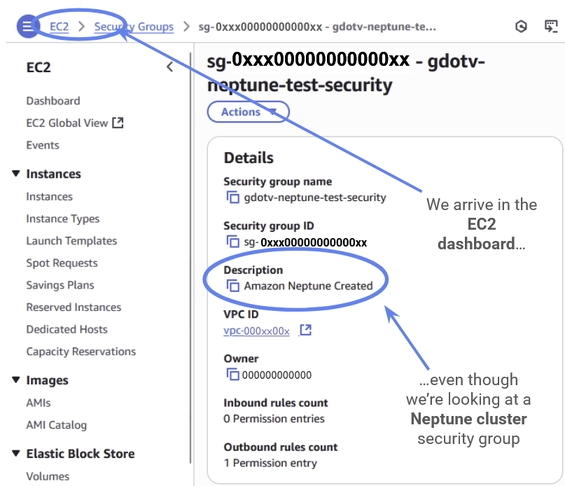
Figure 41: The Neptune security group will open in the EC2 console. This is expected. Security groups are always managed by the EC2 console, even when used by other Amazon Web Services.
Once inside the Neptune security group, you should see Incoming rules and Outgoing rules just like we did for the EC2 security group.
This time though, we will have to make a change. We need to set up a rule that will allow our EC2 instance to access our Neptune cluster. Go to Incoming rules and click Edit Inbound Rules.
Now create a rule with the below specifications. First, set the port range to 8182. Next, you want to set the source to the security group id of the EC2 instance security group from the previous step (“Configuring the EC2 security group”). Remember that we noted this down at the same time as when we found the public DNS.
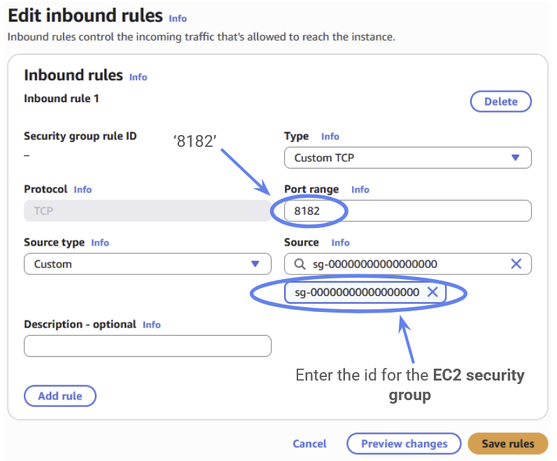
Figure 42: The Neptune security group will open in the EC2 console. This is expected. Security groups are always managed by the EC2 console, even when used by other Amazon Web Services.
This new rule will allow us to access our Neptune cluster from within the EC2 instance (and any other that might be in the same security group.
All outgoing traffic should already be allowed by the outgoing rules, and you can leave that unchanged.
Step 2.5: How to SSH into Your VPC
Congratulations! You’ve now set up our Amazon Web Services example with all the appropriate permissions. We’re finally ready to connect to our Neptune cluster.
The method we’ll use to connect is ssh. In order for our ssh tunnel to work, you’ll need three things:
- The private key that you downloaded in Step 2.2
- The EC2 public DNS (endpoint) that you noted down in Step 2.4.1
- The Neptune endpoint that you noted down in Step 2.4.2
See the diagram below:
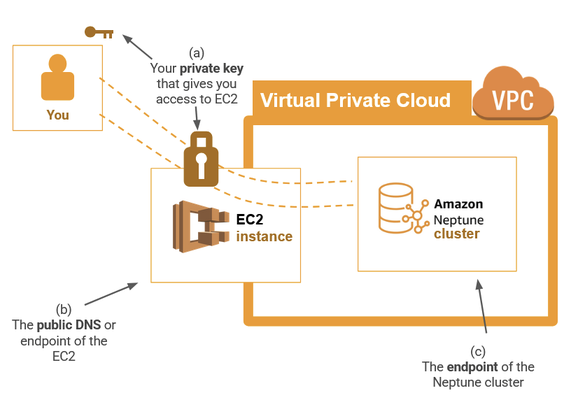
Figure 43: An illustration of where we will use our three tools to enter the Neptune cluster.
Step 2.5.1: The SSH Command
You should now open Command Prompt for Windows or Terminal for macOS and enter the following command, editing the highlighted parts with your inputs (a), (b) and (c):
ssh -i path/to/keypairfilename.pem ec2-user@Ec2Endpoint -N -L 8182:NeptuneEndpoint:8182
Note that in Windows, paths are typically indicated with backwards slashes (\) instead of forward slashes (/). If you are interested, the individual components of this command are detailed in the image below:
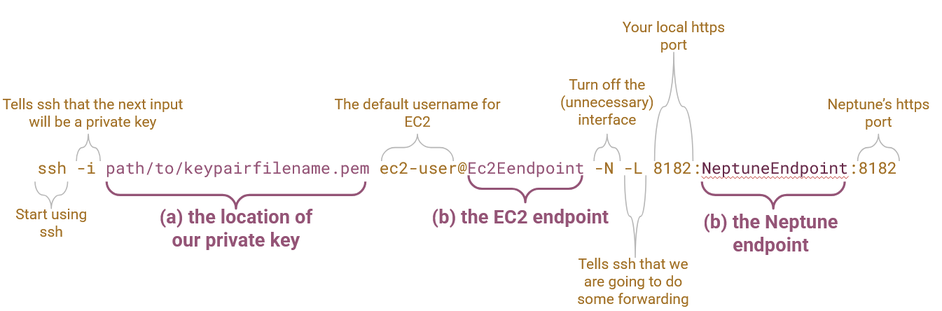
Figure 44: The anatomy of the ssh command.
When you hit enter, nothing should happen. If the terminal is left hanging and you get no error message, that is a good sign.
You can check if the connection is working by navigating to https://localhost:8182/status on your web browser. (Note that it is important to use https and not http .) You should see a screen like the following:

Figure 45: A successful status page found at https//127.0.0.18182/status
The reason you can see this is because our ssh tunnel is set up to receive data coming from the database on our localhost port 8182 (https).
Troubleshooting
If you don’t see the page above, try running the following command:
ssh -i path/to/keypairfilename.pem ec2-user@Ec2Endpoint
This will log you into the EC2, without trying to access the Amazon Neptune cluster. You should get a welcome message like this:
Figure 46: A welcome message indicating successful connection to the EC2 instance over ssh.
If you see this log-in message, then the EC2 connection is working. This means that you’re having some issue when connecting to the Neptune cluster. You should check you’ve set up your security groups correctly as in Step 2.4.2 and ensure that you are using https and not http when accessing https://127.0.0.1:8182/status.
If, however, you can’t even log into the EC2 instance, then you should check that your EC2 is set up correctly and that your path to your private key is correct.
Step 2.5.2: Editing Your Hosts File
Ideally, we don’t want to have to access our Neptune cluster via our localhost IP address. Instead, it’s better if we can use the actual Neptune endpoint address. The way we do this is by editing our hosts file.
- On Windows you can find the hosts file at C:\Windows\System32\drivers\etc\hosts. Note that you will need to run your text editor as Administrator in order to edit the file.
- On macOS you can exit your file by opening the Terminal and running
sudo nano /etc/hosts
You should edit this file and add the following line (making sure to insert your Neptune endpoint):
127.0.0.1 localhost NeptuneEndpoint
This line will tell other applications on your computer — such as G.V() — to look for the Neptune endpoint by listening on your local port.
You may need to flush your DNS before these changes take effect.
- On Windows, run
ipconfig /flushdnsin Command Prompt. - On Mac, use these instructions for your version of macOS.
Double check that your update worked by making sure you see the same status page as before at https://[NeptuneEndpoint]:8182/status
Part 3: Adding G.V() to the Mix
Phew! That was a lot of hard work. The next step is much easier.
Once you’ve set up your Amazon Web Services according to the above steps, opening your cluster in G.V() is straightforward. If you haven’t already installed G.V(), head on over to the download portal and do that.
Step 3.1: Connecting in 1, 2, 3 with G.V()
Next, open G.V() and click New Database Connection.
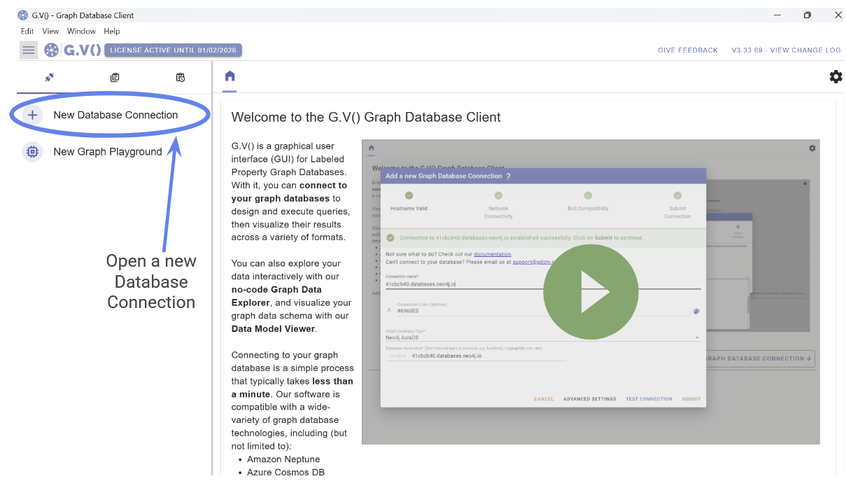
Figure 47: Open a new database connection from inside G.V().
The Database Type is Amazon Neptune, and then enter your Neptune endpoint in Database hostname. (Note that “localhost” will also work as the hostname, since we are forwarding through localhost, but it’s better to use the Neptune endpoint).
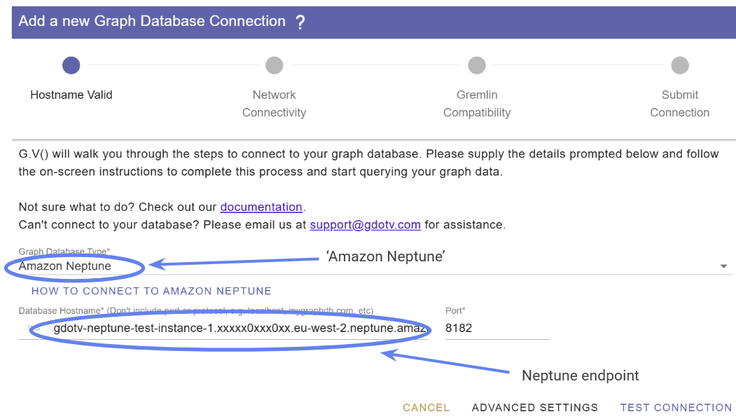
Figure 48: The database type is “Amazon Neptune” and you should enter your Amazon Neptune endpoint as the database hostname.
If all went according to plan, then you should get the following confirmation message:
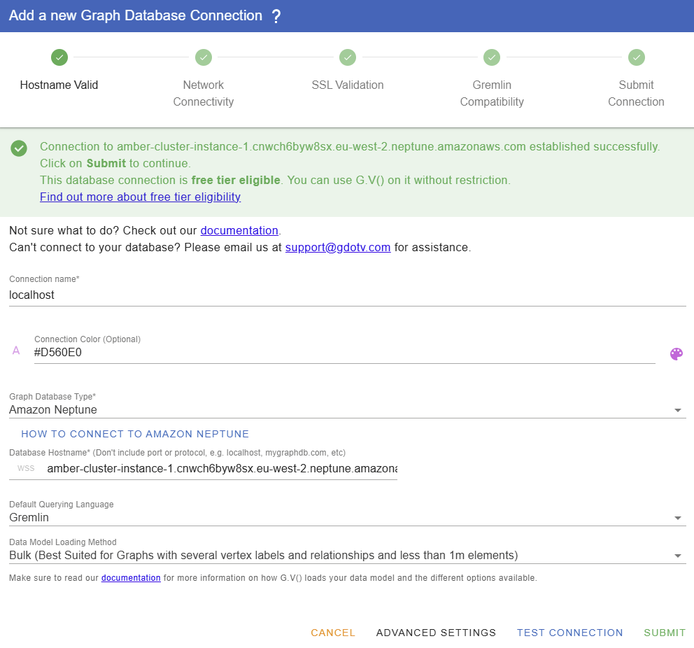
Figure 49: A confirmation message indicating a successful connection.
Congratulations! You have successfully connected to a Neptune cluster with G.V()!
Step 3.2: Exploring Amazon Neptune in G.V()
For this part, we’re using a social media dataset pre-loaded on our Neptune cluster. We’re not covering loading data into Neptune in this post, but for more information check out this guide from the Amazon Neptune team.
Once you have your data loaded into your cluster, you’re ready to start querying! Note that G.V() will allow you to write your queries in either Cypher or Gremlin with a handy dropdown menu.
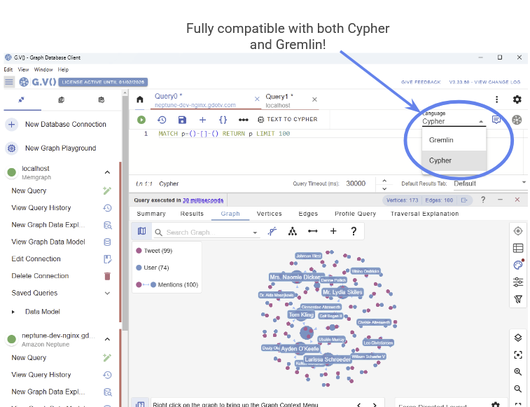
Figure 50: G.V() is fully compatible with both Cypher and Gremlin.
The interface is user friendly, allowing you to manipulate individual nodes with ease:
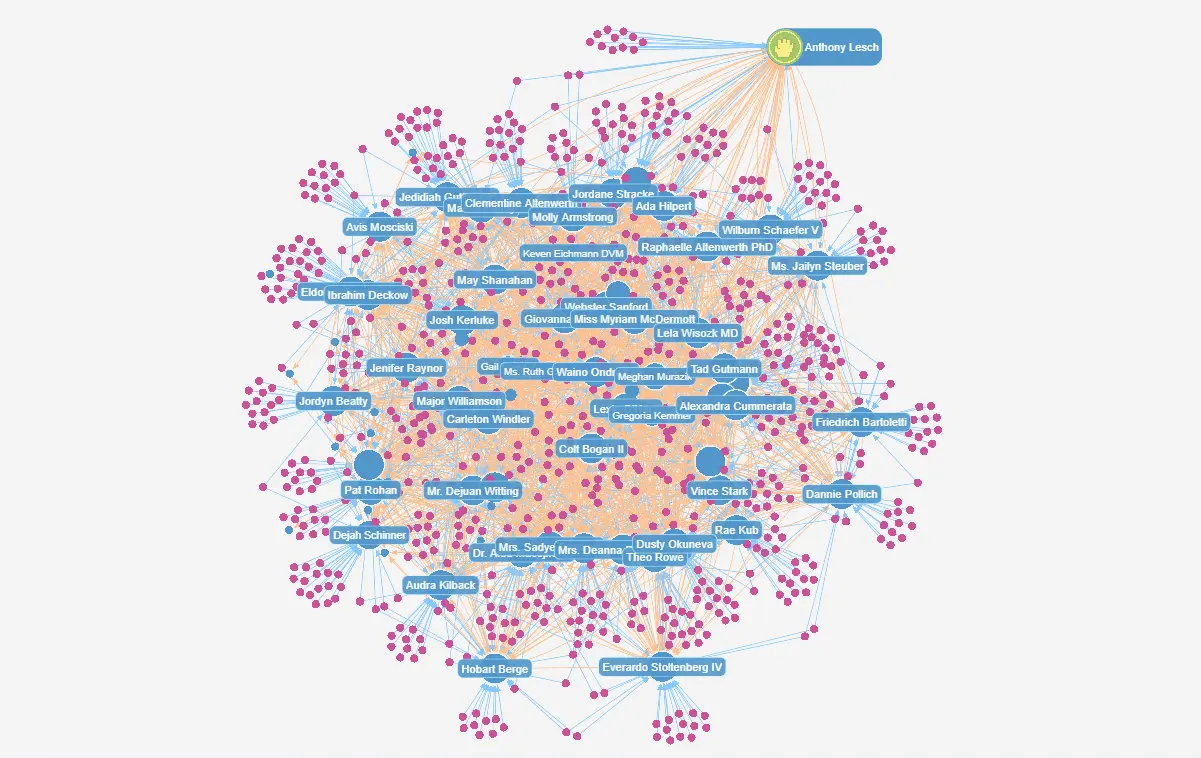
Figure 51: You can easily manipulate your graph in G.V().
You can also choose from a number of available graph layouts and other data visualization options:
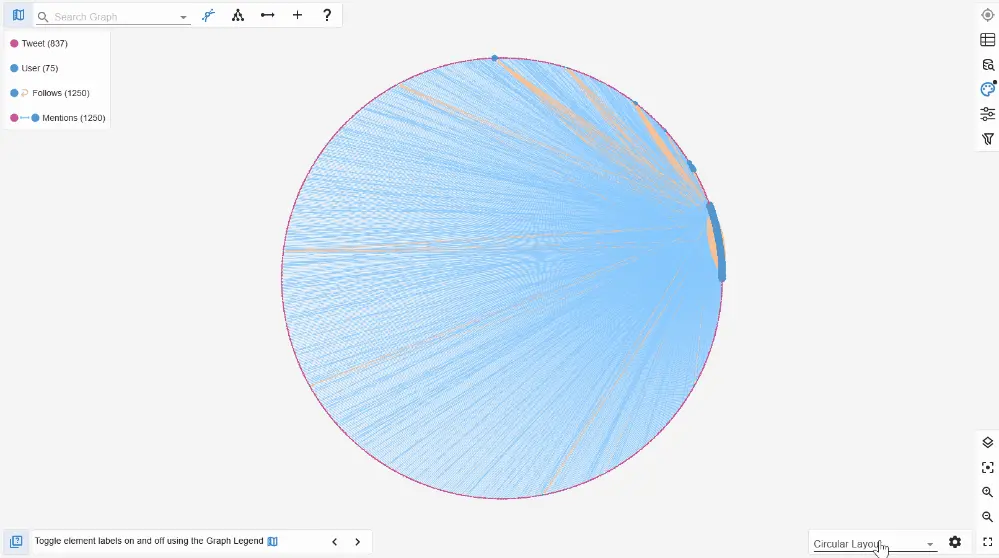
Figure 52: Try out different layout configurations with G.V().
You can hover over particular nodes to highlight that node’s relationships:
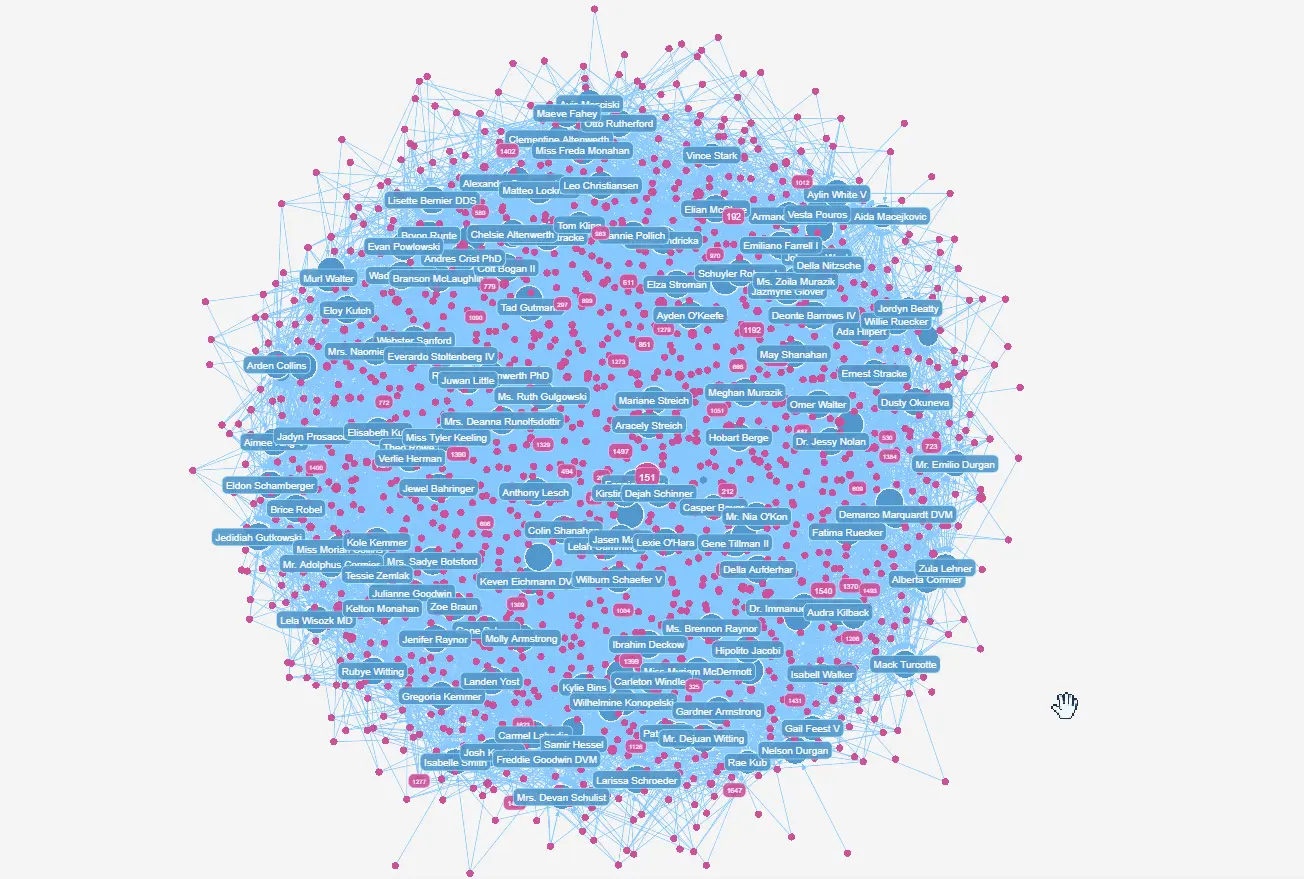
Figure 53: Take a close look at individual nodes inside G.V().
To get a broad overview of our data, we can explore the Graph Data Model:
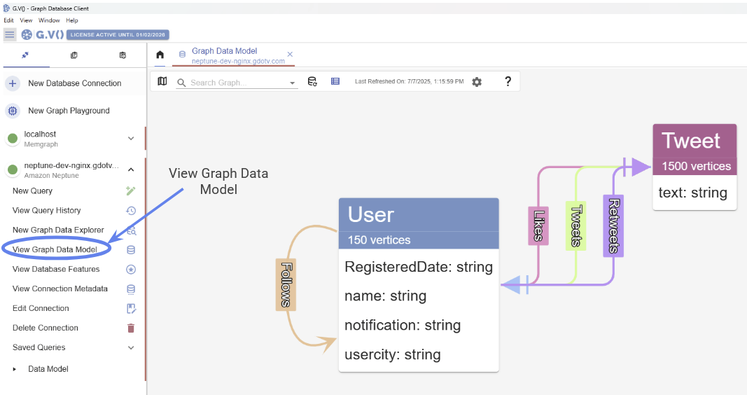
Figure 54: Explore the data model inside G.V().
You’re now ready to access your Amazon Neptune cluster graph database from your device — and in the process you’ve opened the door to the world of graph visualization offered by G.V().
At first, the process might have seemed complex, especially if you’re not familiar with EC2 instances or setting up an ssh tunnel. But the good news is that the steps are the same for every Amazon Neptune cluster you set up. Before long, you’ll have the hang of it and be connecting your database to G.V(), or any other local interface, within seconds.
We hope you’ve found this guide helpful and look forward to hearing what other Amazon Neptune guides or graph database walkthroughs you’d like to see next.
Ready to explore and visualize your Amazon Neptune data like never before? Download G.V() today and get the most out of your graph database.
<< Let’s Do This >>
![Evaluating Codebase-Oriented RAG through Knowledge Graph Analysis [Part 2]](https://gdotv.com/wp-content/uploads/2026/03/knowledge-graph-analysis-codebase-oriented-rag-part-2.jpg "Evaluating Codebase-Oriented RAG through Knowledge Graph Analysis [Part 2]")
![Announcing SPARQL Query Guardrails, Dashboarding, Query Editor Upgrades, & More [v3.53.111 Release Notes]](https://gdotv.com/wp-content/uploads/2026/03/rdf-sparql-query-guardrails-interactive-graph-dashboarding-gdotv-release.jpg "Announcing SPARQL Query Guardrails, Dashboarding, Query Editor Upgrades, & More [v3.53.111 Release Notes]")
![Cypher SET: Updating Node Properties in Your Graph Database [Byte-Sized Cypher Series]](https://gdotv.com/wp-content/uploads/2026/03/set-clause-byte-sized-cypher-query-langauge-video-series.jpg "Cypher SET: Updating Node Properties in Your Graph Database [Byte-Sized Cypher Series]")